

Establishing Static Code Analysis Using SonarQube
In this tutorial, we'll explain how to get started with SonarQube, and show how to connect it with your other projects.
With SonarQube, you can automate and manage static code analyses and make use of a number of features, including configurable quality gates and problem reporting. By integrating with a variety of additional tools, including CI/CD pipelines like Jenkins and project frameworks like Maven, SonarQube distinguishes itself even more.
About Static Code Analysis
Code is reviewed for problems, errors, and standard infractions using static code analysis. Static code analysis, on the one hand, examines code more thoroughly and comprehensively than compilers and interpreters do when it comes to grammar and error checking.
However, static code analysis may frequently identify problems that a human code reviewer would overlook while automating code review. Static code analysis tools may enforce coding standards and maintain readability within your codebase, as well as keep any problems out of production settings.
Why SonarQube?
SonarQube is an application that integrates with your projects to automate static code reviews. A large number of programming languages are supported by SonarQube, which also includes helpful coding standards. In addition, SonarQube may be used with its CLI tool or integrated with a variety of project frameworks, including .NET and Maven.
SonarQube places a strong emphasis on DevOps and CI/CD platform interoperability. There, SonarQube can automate quality gating and reporting as part of your Jenkins pipelines or GitHub processes.
SonarQube Installation
SonarQube runs as a server that is hosted on its own. You can utilize the Command Line Interface (CLI) in conjunction with a token created in your SonarQube instance, or you can integrate the SonarScanner plugin to start code analysis for projects.
Installing SonarQube and starting the SonarQube server are the first steps to take. This guide walks through the process using Docker Compose, which offers a handy method to manage the database implementation and the SonarQube server from one single source.
Install Docker Compose and Docker
The following steps will guide you to the steps needed to install Docker on Debian, CentOS, Ubuntu, and Fedora systems with the help of a plugin called ‘Docker Compose’. For the installation on other operating systems, you can check official instructions.
On Ubuntu and Debian
- Remove any earlier Docker installations.
<pre class="codeWrap"><code>sudo apt remove docker docker-engine docker.io containerd runc </code></pre>
- To add a Docker repository on the APT package manager, install prerequisite packages.
<pre class="codeWrap"><code>sudo apt install ca-certificates curl gnupg lsb-release</code></pre>
- Next, you need to insert the GPG key for the Docker repository into the APT package manager. If you're using an Ubuntu distribution, replace "debian" with "ubuntu" in the URL within the following command.
<pre class="codeWrap"><code>sudo mkdir -m 0755 -p /etc/apt/keyrings
curl -fsSL https://download.docker.com/linux/debian/gpg | sudo gpg --dearmor -o /etc/apt/keyrings/docker.gpg
</code></pre>
- Use the APT package manager to add the Docker repository. If you're utilizing an Ubuntu installation, replace "debian" with "ubuntu" in the command's URL.
<pre class="codeWrap"><code>echo "deb [arch=$(dpkg --print-architecture) signed-by=/etc/apt/keyrings/docker.gpg] https://download.docker.com/linux/debian $(lsb_release -cs) stable" | sudo tee /etc/apt/sources.list.d/docker.list > /dev/null</code></pre>
- Refresh the APT package lists and install Docker Engine alongside the Docker Compose plugin.
<pre class="codeWrap"><code>sudo apt update
sudo apt install docker-ce docker-ce-cli containerd.io docker-buildx-plugin docker-compose-plugin
</code></pre>
Fedora and CentOS
- Remove the earlier Docker installations.
<pre class="codeWrap"><code>sudo dnf remove docker docker-client docker-client-latest docker-common docker-latest docker-latest-logrotate docker-logrotate docker-selinux docker-engine-selinux docker-engine</code></pre>
- To have access to tools needed to manage DNF repositories, core plugins needed to be installed for DNF package manager.
<pre class="codeWrap"><code>sudo dnf -y install dnf-plugins-core</code></pre>
- Include the Docker repository in the DNF package manager. If you are using Fedora then you need to replace "centos" with "fedora" in the URL provided in this command.
<pre class="codeWrap"><code>sudo dnf config-manager --add-repo https://download.docker.com/linux/centos/docker-ce.repo</code></pre>
- Install both the Docker engine and Docker Compose plugin
<pre class="codeWrap"><code>sudo dnf install docker-ce docker-ce-cli containerd.io docker-buildx-plugin docker-compose-plugin</code></pre>
- You might be asked for the verification of the GPG Key and you will be able to see this listed key.
<pre class="codeWrap"><code>060A 61C5 1B55 8A7F 742B 77AA C52F EB6B 621E 9F35</code></pre>
Complete the Installation
To check the running of Docker Daemon, use the following command:
<pre class="codeWrap"><code>sudo systemctl status docker</code></pre>
<pre class="codeWrap"><code>● docker.service - Docker Application Container Engine Loaded: loaded (/usr/lib/systemd/system/docker.service; enabled; vendor preset: disabled) Active: active (running) since Thu 2023-02-16 20:38:07 UTC; 1s ago Docs: https://docs.docker.com</code></pre>
In case, Docker Daemon is not active, use the following command to start it.
<pre class="codeWrap"><code>sudo systemctl enable docker
sudo systemctl start docker
</code></pre>
To ensure smooth Docker operations, assign your limited user to the Docker user group. This step eliminates the necessity of running Docker commands with root privileges or using sudo. Simply replace "example-user" with the username of your limited user.
<pre class="codeWrap"><code>sudo usermod -aG docker example-user</code></pre>
During the last step, you need to restart the shell session. For this, you just need to first exit and then enter.
System Preparation
To use SonarQube effectively, you'll need to modify some system configurations. These settings include changing limits for files, map count, and threads. You also need to open the port on which SonarQube runs.
1. Open the SonarQube’s port in the firewall of the system. Use the following command:
- On Ubuntu and Debian:
<pre class="codeWrap"><code>sudo ufw allow 9000/tcp</code></pre>
- On CentOS and Fedora:
<pre class="codeWrap"><code>sudo firewall-cmd --zone=public --add-port=9000/tcp --permanent
sudo firwall-cmd --reload
</code></pre>
2. To ensure optimal performance, SonarQube necessitates specific minimum values for map counts, files, and thread limits. The provided commands generate separate files for these configurations, ensuring their persistence across system reboots.
<pre class="codeWrap"><code>sudo tee /etc/sysctl.d/99-sonarqube.conf > /dev/null <<EOF
vm.max_map_count=524288
fs.file-max=131072
ulimit -n 131072
ulimit -u 8192
EOF
</code></pre>
<pre class="codeWrap"><code>sudo tee /etc/security/limits.d/99-sonarqube.conf > /dev/null <<EOF
sonarqube - nofile 131072
sonarqube - nproc 8192
EOF
</code></pre>
3. Reboot the system.
<pre class="codeWrap"><code>sudo reboot</code></pre>
Setting Up and Launching SonarQube
Your system can now run a SonarQube server. Since this configuration makes use of Docker Compose, the actual installation procedure consists of generating and executing a Compose definition file.
Alternatively, you may view the procedures described in the official installation instructions if you would prefer a more conventional setup for your SonarQube instance.
1. For the setup of Docker Compose, create, and then move to the new directory.
<pre class="codeWrap"><code>mkdir ~/sonarqube-compose
cd ~/sonarqube-compose
</code></pre>
2. Make a file called docker-compose.yml in this directory and transfer this file's contents here.
<pre class="codeWrap"><code>version: "3"
services:
sonarqube:
image: sonarqube:community
depends_on:
- db
environment:
SONAR_JDBC_URL: jdbc:postgresql://db:5432/sonar
SONAR_JDBC_USERNAME: sonar
SONAR_JDBC_PASSWORD: sonar
volumes:
- sonarqube_data:/opt/sonarqube/data
- sonarqube_extensions:/opt/sonarqube/extensions
- sonarqube_logs:/opt/sonarqube/logs
ports:
- "9000:9000"
db:
image: postgres:12
environment:
POSTGRES_USER: sonar
POSTGRES_PASSWORD: sonar
volumes:
- postgresql:/var/lib/postgresql
- postgresql_data:/var/lib/postgresql/data
volumes:
sonarqube_data:
sonarqube_extensions:
sonarqube_logs:
postgresql:
postgresql_data:
</code></pre>
The definition runs the SonarQube Docker image with the necessary volumes and contains the community version of the image. Additionally, a PostgreSQL database server specification is provided, which is what the SonarQube server uses to store data.
3. Enter the following command in the directory containing the docker-compose.yml file to begin the Docker Compose setup for SonarQube.
<pre class="codeWrap"><code>docker compose up -d</code></pre>
Docker Compose initiates the SonarQube server and PostgreSQL by downloading and prepping the required resources. Docker Compose commands may be used to control the servers from this location.
Caution
Do not use the docker system prune commands or docker volume prune, nor the -v option when using the docker compose down command. By doing this, your generally persistent data could be deleted.
Accessing the Interface
Your SonarQube server must be up and running after doing a docker compose-up. You should log in to begin with in order to customize your administrator user password and familiarize yourself with the UI.
1. Open a web browser and go to port 9000 on the public IP address (or domain name, assuming you already have one set up) of your SonarQube server.
- This opens the SonarQube login screen.
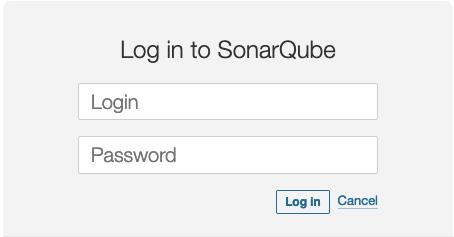
2. Enter the login credentials found here to access your SonarQube server.
- Login as admin as username and admin as password
- SonarQube encourages you to update this admin user's password right away.
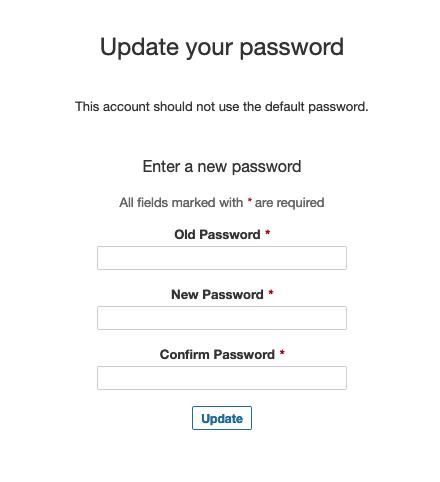
- SonarQube takes you to your server's dashboard once you reset the administrator user's password. You may view the findings for your analysis and the tools required to begin evaluating your code right from this dashboard.
How to Use SonarQube for Code Analysis
The next step is to enable SonarQube code analysis for one of the projects you are working on after setting up a SonarQube server. This portion of the course leads you through using Spring Boot and Maven to create a basic example project. Adding the SonarScanner plugin to a Maven project and initiating scanning are demonstrated in the example.
The example also demonstrates how to get analysis findings from through the SonarQube interface and activate projects. Numerous project kinds can use these phases. Furthermore, looking through them might help you understand SonarQube's capabilities and how to get the most out of it.
Example Project
SonarQube scans and analyzes a project's code using the SonarScanner. You can use SonarScanner as a CLI tool for projects that are not supported or as a plugin for an existing framework.
This tutorial's sample project is built with Maven, and SonarScanner may be easily integrated into the project. To build the project and learn the ways for the addition of the SonarScanner plugin, follow these instructions.
Setting Up Maven
You must have Maven installed since this project utilizes the Maven framework for developing a foundation Java web application.
1. Go to the Maven downloading page and get the most recent Maven version's URL.
2. After downloading the package containing the most recent Maven binary, relocate the binary directory to your system's central directory. Use the filename and download URL you discovered in the preceding step in lieu of those listed below.
<pre class="codeWrap"><code>cd ~/
wget https://dlcdn.apache.org/maven/maven-3/3.9.1/binaries/apache-maven-3.9.1-bin.tar.gz
tar xzvf apache-maven-3.9.1-bin.tar.gz
sudo mv apache-maven-3.9.1 /usr/local/maven
</code></pre>
3. Make a shell script and include it in your shell profile. As a result, your shell path now includes the Maven binary directory and the two environment variables for the respective locations of Maven and Java.
<pre class="codeWrap"><code>sudo tee "/etc/profile.d/maven.sh" > /dev/null <<'EOF'
export JAVA_HOME=/usr/lib/jvm/jre-openjdk
export MAVEN_HOME=/usr/local/maven
export PATH=${PATH}:/usr/local/maven/bin
EOF
sudo chmod +x /etc/profile.d/maven.sh
</code></pre>
4. Use the following command for loading the updated script above into the current shell profile, or exit and reopen the shell.
<pre class="codeWrap"><code>source /etc/profile.d/maven.sh</code></pre>
5. Check to see if the Maven binary has become available and installed.
<pre class="codeWrap"><code>mvn --version</code></pre>
<pre class="codeWrap"><code>Apache Maven 3.9.1 (2e178502fcdbffc201671fb2537d0cb4b4cc58f8)
Maven home: /usr/local/maven
Java version: 17.0.6-ea, vendor: Red Hat, Inc., runtime: /usr/lib/jvm/java-17-openjdk-17.0.6.0.9-0.3.ea.el8.x86_64
Default locale: en_US, platform encoding: UTF-8
OS name: "linux", version: "4.18.0-483.el8.x86_64", arch: "amd64", family: "unix"</code></pre>
6. /usr/local/maven/conf/settings.xml is the location of the Maven global settings file. Open it and make the following modifications there:
- You can activate the SonarScanner plugin by adding the <pluginGroup> line to the <pluginGroups> block.
<pre class="codeWrap"><code>[...]
<pluginGroups>
<pluginGroup>org.sonarsource.scanner.maven</pluginGroup>
</pluginGroups>
[...]
</code></pre>
- Add the SonarScanner plugin's <profile> block, as seen below, to the <profiles> block. In this example, replace SONARQUBE_URL with the real SonarQube server URL. Alternatively, to utilize localhost, omit the <sonar.host.url> section.
<pre class="codeWrap"><code>[...]
<profiles>
[...]
<profile>
<id>sonar</id>
<activation>
<activeByDefault>true</activeByDefault>
</activation>
<properties>
<sonar.host.url>
http://SONARQUBE_URL:9000
</sonar.host.url>
</properties>
</profile>
</profiles>
</code></pre>
Starting a Project using Spring Boot
At this point, you may construct your basic project using Maven. This tutorial makes use of the framework called Spring Boot to provide a helpful foundation for a web application. To save you from the hassle of manually creating the required files and folders, the guide additionally uses the Spring Boot CLI to setup the project.
1. Set up the CLI for Spring Boot. Look up the URL for the most recent stable version in the Spring Boot CLI installation instructions, then substitute it in the command below.
<pre class="codeWrap"><code>wget https://repo.maven.apache.org/maven2/org/springframework/boot/spring-boot-cli/3.0.5/spring-boot-cli-3.0.5-bin.tar.gz
tar xzvf spring-boot-cli-3.0.5-bin.tar.gz
sudo mv spring-3.0.5 /usr/local/spring
</code></pre>
2. Make a shell script for the shell profile and add the Spring CLI binary within the shell path, just like a Maven installation.
<pre class="codeWrap"><code>sudo tee "/etc/profile.d/spring.sh" > /dev/null <<'EOF'
export SPRING_HOME=/usr/local/spring
export PATH=${PATH}:/usr/local/spring/bin
EOF
sudo chmod +x /etc/profile.d/spring.sh
</code></pre>
3. For the modifications to the shell route to take effect, either run the command here or exit and then reopen the shell.
<pre class="codeWrap"><code>source /etc/profile.d/spring.sh</code></pre>
4. Make a project using Spring Boot.
- This example command first creates the example-java-project project directory and gives it that name. In addition, the script defines the project's group, com.example.app. The project subdirectories are then created after extracting the resultant zip file.
<pre class="codeWrap"><code>mkdir ~/example-java-project
cd ~/example-java-project
spring init --group-id=com.example.app \
--artifact-id=example-java-project \
--build=maven --language=java \
--java-version=17
unzip example-java-project.zip
rm example-java-project.zip
</code></pre>
5. The <plugin> block that is shown below should be added at the last of the <plugins> section which is already present in the file when the pom.xml file is opened.
- To begin with, make sure you are using the most recent version of the plugin.
<pre class="codeWrap"><code>[...]
<plugin>
<groupId>org.sonarsource.scanner.maven</groupId>
<artifactId>sonar-maven-plugin</artifactId>
<version>3.9.1.2184</version>
</plugin>
</plugins>
</pluginManagement>
</build>
</code></pre>
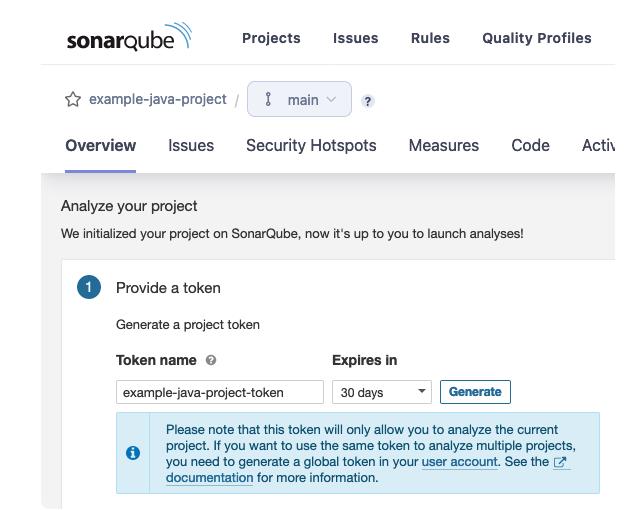
Creating a New Project in SonarQube
Creating a project item in the interface of the SonarQube server completes the setup process for your SonarQube project. By doing this, you will receive a token that you may utilize within the Maven project to start scanning.
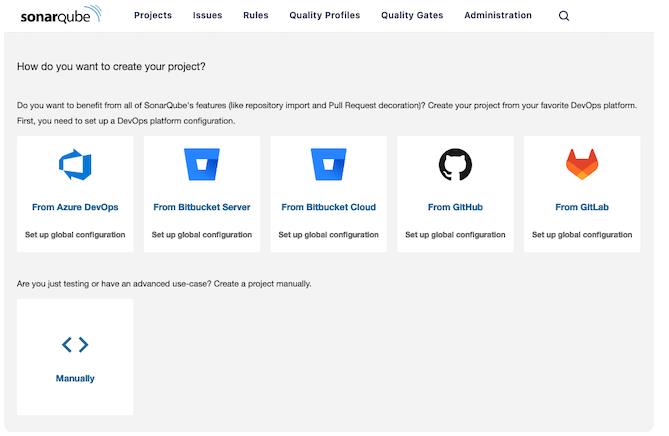
1. Reopen the SonarQube interface and choose the manual project creation option from the list of available choices.
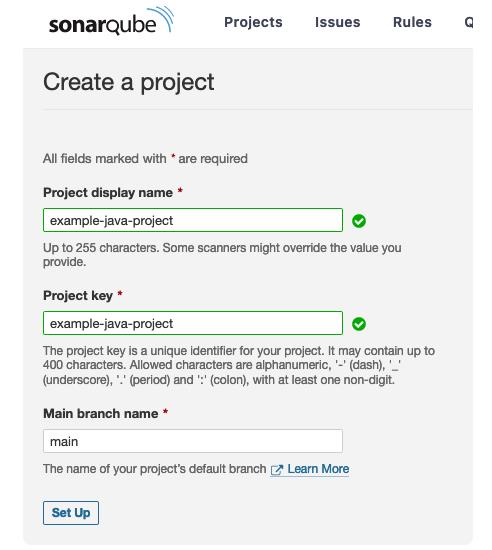
2. Give the project a name as well as a key. For both of these parameters, this guide uses example-java-project, the name taken from the Maven project.
3. When asked how SonarQube must evaluate the project, choose Locally.
4. On the screen that appears, generate a token, give it a name, and select an expiration date.
Reviewing and Running the Analysis
To evaluate SonarQube's code analysis, just execute the SonarScanner on the sample project. Everything is now configured to use the Maven project manager to do a manual scan.
1. To configure the Maven project including its associated dependencies and to start the initial code scan, use this command. The project token you created for the project inside the SonarQube interface should be substituted for SONARQUBE_PROJECT_TOKEN.
<pre class="codeWrap"><code>mvn clean verify sonar:sonar -Dsonar.projectKey=example-java-project -Dsonar.projectName='example-java-project' -Dsonar.token=SONARQUBE_PROJECT_TOKEN</code></pre>
- If you haven't altered the project's dependencies, you can abbreviate the command on later runs as you can see below.
<pre class="codeWrap"><code>mvn sonar:sonar -Dsonar.projectKey=example-java-project -Dsonar.projectName='example-java-project' -Dsonar.token=SONARQUBE_PROJECT_TOKEN</code></pre>
2. Take a look at the analysis findings of SonarQube by navigating to the project page using the SonarQube server interface.
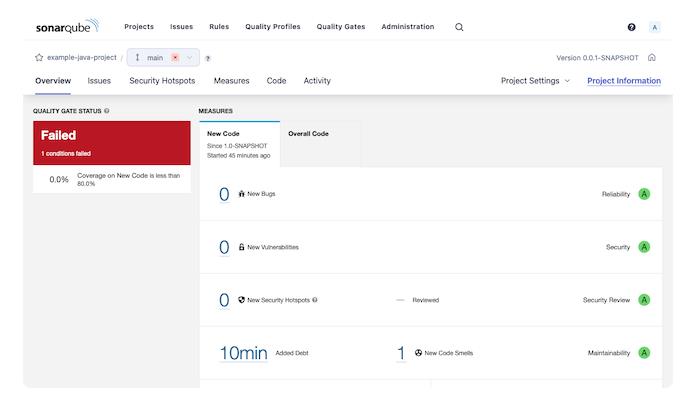
SonarQube's analysis of the Spring Boot base project is unsuccessful. You may read a description of the issue by going to the Issues section and understanding why this failure happened.
SonarQube detected an issue in the project's test case, indicating that it lacks any assertions. This interface allows you to handle the error by, for example, renaming it, passing this instance, or marking the problem as resolved.
Conclusion
With an operational SonarQube server and a sample Maven project at your disposal, you can now begin developing your projects. You may view more about the several project frameworks that SonarQube interfaces with by clicking the link up above.
SonarQube also has the advantage of being integrated with CI/CD pipelines such as Jenkins. You can begin to envision how it would appear by exploring our Jenkins Continuous Integration/Continuous Deployment setup on Linode, designed to work seamlessly with any major cloud provider. The design has a code analysis stage and provides a reliable CI/CD system.


Facing Challenges in Cloud, DevOps, or Security?
Let’s tackle them together!
get free consultation sessions
We will contact you shortly.
