

How to Set Up Nginx Ingress Controller on Kubernetes
In this comprehensive Ingress tutorial, we'll teach you how to set up an Nginx Ingress controller.
Today, we'll go through a detailed step by step on how to set up an Nginx Ingress controller on Kubernetes. So, keep reading, and grab a pen. Let's get started.
There are two types of Nginx ingress controllers.
- Nginx ingress controller by the Kubernetes community
- Nginx ingress controller by Nginx Inc
For this purpose, we will be employing the Nginx controller from Kubernetes community.
Ingress & Nginx Ingress Controller Architecture
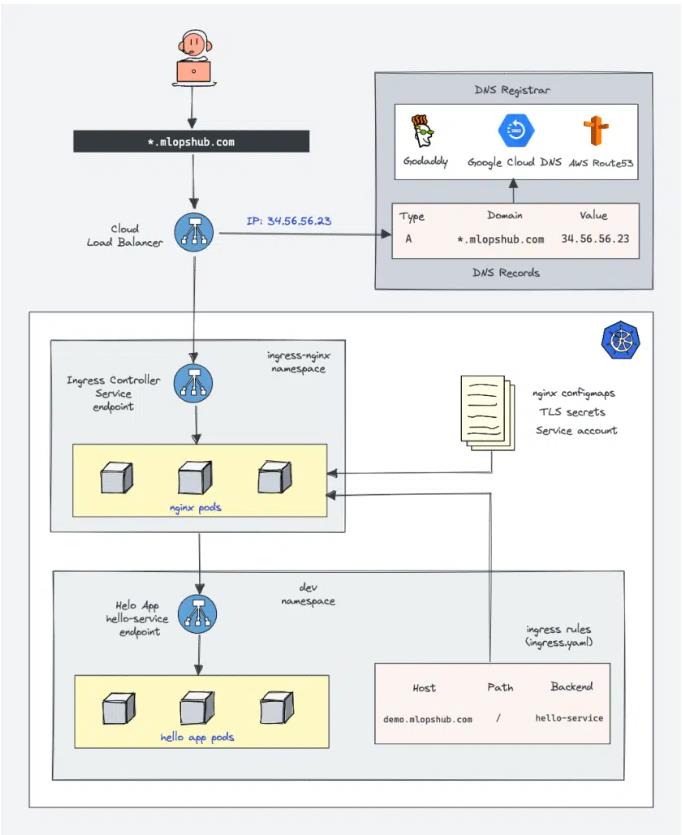
This image presents a high-order architecture of Kubernetes Ingress utilizing the Nginx Ingress controller. In this tutorial, we'll be focusing on constructing the setup depicted in the architecture.
Prerequisites
- A Kubernetes cluster
- The 'kubectl' utility installed and authenticated for the Kubernetes cluster
- Administrative privileges for the Kubernetes cluster
- A valid domain to point to the ingress controller Load Balancer IP. (Optional)
- If you are implementing this setup on Google Cloud, ensure to assign your account the necessary administrative privileges to facilitate cluster roles.
<pre class="codeWrap"><code>ACCOUNT=$(gcloud info --format='value(config.account)')
kubectl create clusterrolebinding owner-cluster-admin-binding \
--clusterrole cluster-admin \
--user $ACCOUNT
</code></pre>
Nginx Ingress Controller Kubernetes Manifests
All the Kubernetes manifests necessary for this tutorial have been hosted on our Github repository. Please clone it and utilize it for deployment purposes. The source of these manifests is the official Nginx community repository.
<pre class="codeWrap"><code>git clone https://github.com/techiescamp/nginx-ingress-controller</code></pre>
Initially, by deploying Nginx controllers using YAML manifests, we will familiarize ourselves with all the connected Kubernetes objects. After we have understood them, we will proceed to deploy them through the Helm chart.
Additionally, for convenience, here is a one-liner provided to deploy all the objects simultaneously.
<pre class="codeWrap"><code>kubectl apply -f https://raw.githubusercontent.com/kubernetes/ingress-nginx/controller-v1.1.1/deploy/static/provider/cloud/deploy.yaml</code></pre>
Note: To grasp the Nginx ingress controllers objects and the connections between them, I would propose creating objects one by one from the repo. Once you've grasped the mechanism, you could switch to using a single manifest or a Helm chart for deployment purposes.
Deploy Nginx Ingress Controller With Manifests
To set up a functioning Nginx controller, it is necessary to deploy the following Kubernetes objects:
- Ingress-nginx namespace
- Service account/Roles/ClusterRoles for Nginx admission controller
- Validating webhook Configuration
- Jobs to create/update Webhook CA bundles
- Service account/Roles/ClusterRoles of Nginx controller deployment
- Nginx controller configmap
- Services for nginx controller & admission controller
- Ingress controller deployment
Note: You have the option to create all the manifests on your own, or use the provided Github repository. Nevertheless, I strongly recommend reviewing each manifest and comprehending what you are deploying.
Need for Admission Controller & Validating Webhook
The Kubernetes Admission Controller is essentially a compact code segment designed to authenticate or update Kubernetes objects prior to their creation. Here, it serves as an admission controller to authorize ingress objects. This Admission Controller code is embedded within the Nginx controller, listening on port 8443.
So, why exactly is an admission controller required?
Absence of an admission controller allows for the deployment of an ingress object that may encompass incorrect configurations. Such misguided configurations could disrupt all ingress rules bound to the ingress controller.
Implementing an admission controller ensures the ingress object we are crafting possesses the right configurations, thereby preserving routing protocols.
Here's an outline of how admission controllers function in Nginx:
- Upon deploying an ingress YAML, the Validation admission intercepts the associated request.
- Kubernetes API subsequently propels the ingress object to the validation admission controller service endpoint, mapped by admission webhook endpoints.
- This service forwards the request to the Nginx deployment on port 8443 to authenticate the ingress object.
- The admission controller sends back a response to the k8s API.
- Provided it's a valid response, the API proceeds to create the ingress object.
Let's progress onward to create Kubernetes objects for the ingress controller.
Create a Namespace
We are now all set to deploy all of the Nginx controller objects within the ingress-nginx namespace.
Now, let's proceed with the creation of the namespace.
<pre class="codeWrap"><code>kubectl create ns ingress-nginx</code></pre>
Create Admission Controller Roles & Service Account
It is essential to create a Role and ClusterRole featuring the necessary permissions and have it bound to the ingress-nginx-admission service account. Proceed to create a file named admission-service-account.yaml and copy the given contents.
<pre class="codeWrap"><code>---
apiVersion: v1
kind: ServiceAccount
metadata:
labels:
app.kubernetes.io/component: admission-webhook
app.kubernetes.io/instance: ingress-nginx
app.kubernetes.io/name: ingress-nginx
name: ingress-nginx-admission
namespace: ingress-nginx
---
apiVersion: rbac.authorization.k8s.io/v1
kind: Role
metadata:
annotations:
app.kubernetes.io/component: admission-webhook
app.kubernetes.io/instance: ingress-nginx
app.kubernetes.io/name: ingress-nginx
name: ingress-nginx-admission
namespace: ingress-nginx
rules:
- apiGroups:
- ""
resources:
- secrets
verbs:
- get
- create
---
apiVersion: rbac.authorization.k8s.io/v1
kind: RoleBinding
metadata:
labels:
app.kubernetes.io/component: admission-webhook
app.kubernetes.io/instance: ingress-nginx
app.kubernetes.io/name: ingress-nginx
name: ingress-nginx-admission
namespace: ingress-nginx
roleRef:
apiGroup: rbac.authorization.k8s.io
kind: Role
name: ingress-nginx-admission
subjects:-
kind: ServiceAccount
name: ingress-nginx-admission
namespace: ingress-nginx
---
apiVersion: rbac.authorization.k8s.io/v1
kind: ClusterRole
metadata:
labels:
app.kubernetes.io/component: admission-webhook
app.kubernetes.io/instance: ingress-nginx
app.kubernetes.io/name: ingress-nginx
name: ingress-nginx-admission
rules:
- apiGroups:
- admissionregistration.k8s.io
resources:
- validatingwebhookconfigurations
verbs:
- get
- update
---
apiVersion: rbac.authorization.k8s.io/v1
kind: ClusterRoleBinding
metadata:
labels:
app.kubernetes.io/component: admission-webhook
app.kubernetes.io/instance: ingress-nginx
app.kubernetes.io/name: ingress-nginx
name: ingress-nginx-admission
roleRef
: apiGroup: rbac.authorization.k8s.io
kind: ClusterRole
name: ingress-nginx-admission
subjects:-
kind: ServiceAccount
name: ingress-nginx-admission
namespace: ingress-nginx
</code></pre>
Upon completion, move forward with deploying the manifest.
<pre class="codeWrap"><code>kubectl apply -f admission-service-account.yaml</code></pre>
Create Validating Webhook Configuration
Create a file named validating-webhook.yaml, and copy the provided content.
<pre class="codeWrap"><code>---apiVersion: admissionregistration.k8s.io/v1
kind: ValidatingWebhookConfiguration
metadata:
labels:
app.kubernetes.io/component: admission-webhook
app.kubernetes.io/instance: ingress-nginx
app.kubernetes.io/name: ingress-nginx
name: ingress-nginx-admission
webhooks:
- admissionReviewVersions:
- v1
clientConfig:
service:
name: ingress-nginx-controller-admission
namespace: ingress-nginx
path: /networking/v1/ingresses
failurePolicy: Fail
matchPolicy: Equivalent
name: validate.nginx.ingress.kubernetes.io
rules:
- apiGroups:
- networking.k8s.io
apiVersions:
- v1
operations:
- CREATE
- UPDATE
resources:
- ingresses
sideEffects: None
</code></pre>
Proceed with the creation of the ValidatingWebhookConfiguration.
<pre class="codeWrap"><code>kubectl apply -f validating-webhook.yaml</code></pre>
Deploy Jobs To Update Webhook Certificates
The ValidatingWebhookConfiguration operates solely over HTTPS, hence requiring a CA bundle. We utilize kube-webhook-certgen to produce a CA cert bundle as a part of the first job. The generated CA certificates get stored in a secret named ingress-nginx admission. Subsequent to this, a second job is employed to patch the ValidatingWebhookConfiguration object utilizing the CA bundle.
Create a file named jobs.yaml and copy the following content.
<pre class="codeWrap"><code>---
apiVersion: batch/v1
kind: Job
metadata:
labels:
app.kubernetes.io/component: controller
app.kubernetes.io/instance: ingress-nginx
app.kubernetes.io/name: ingress-nginx
name: ingress-nginx-admission-create
namespace: ingress-nginx
spec:
template:
metadata:
labels:
app.kubernetes.io/component: controller
app.kubernetes.io/instance: ingress-nginx
app.kubernetes.io/name: ingress-nginx
name: ingress-nginx-admission-create
spec:
containers:
- args:
- create
- --host=ingress-nginx-controller-admission,ingress-nginx-controller-admission.$(POD_NAMESPACE).svc
- --namespace=$(POD_NAMESPACE)
- --secret-name=ingress-nginx-admission
env:
- name: POD_NAMESPACE
valueFrom:
fieldRef:
fieldPath: metadata.namespace
image: k8s.gcr.io/ingress-nginx/kube-webhook-certgen:v1.1.1
imagePullPolicy: IfNotPresent
name: create
securityContext:
allowPrivilegeEscalation: false
nodeSelector:
kubernetes.io/os: linux
restartPolicy: OnFailure
securityContext:
runAsNonRoot: true
runAsUser: 2000
serviceAccountName: ingress-nginx-admission
---
apiVersion: batch/v1
kind: Job
metadata:
labels:
app.kubernetes.io/component: admission-webhook
app.kubernetes.io/instance: ingress-nginx
app.kubernetes.io/name: ingress-nginx
name: ingress-nginx-admission-patch
namespace: ingress-nginx
spec:
template:
metadata:
labels:
app.kubernetes.io/component: admission-webhook
app.kubernetes.io/instance: ingress-nginx
app.kubernetes.io/name: ingress-nginx
name: ingress-nginx-admission-patch
spec:
containers:
- args:
- patch
- --webhook-name=ingress-nginx-admission
- --namespace=$(POD_NAMESPACE)
- --patch-mutating=false
- --secret-name=ingress-nginx-admission
- --patch-failure-policy=Fail
env:
- name: POD_NAMESPACE
valueFrom:
fieldRef:
fieldPath: metadata.namespace
image: k8s.gcr.io/ingress-nginx/kube-webhook-certgen:v1.1.1
imagePullPolicy: IfNotPresent
name: patch
securityContext:
allowPrivilegeEscalation: false
nodeSelector:
kubernetes.io/os: linux
restartPolicy: OnFailure
securityContext:
runAsNonRoot: true
runAsUser: 2000
serviceAccountName: ingress-nginx-admission
</code></pre>
Once the jobs are executed, describing the ValidatingWebhookConfiguration will reveal the patched bundle.
<pre class="codeWrap"><code>kubectl describe ValidatingWebhookConfiguration ingress-nginx-admission</code></pre>
Create Ingress Controller Roles & Service Account
Begin by creating a file designated ingress-service-account.yaml and copy the following data.
<pre class="codeWrap"><code>---
apiVersion: v1
kind: ServiceAccount
metadata:
labels:
app.kubernetes.io/component: admission-webhook
app.kubernetes.io/instance: ingress-nginx
app.kubernetes.io/name: ingress-nginx
name: ingress-nginx
namespace: ingress-nginx
---
apiVersion: rbac.authorization.k8s.io/v1
kind: Role
metadata:
labels:
app.kubernetes.io/component: controller
app.kubernetes.io/instance: ingress-nginx
app.kubernetes.io/name: ingress-nginx
name: ingress-nginx
namespace: ingress-nginx
rules:
- apiGroups:
- ""
resources:
- namespaces
verbs:
- get
- apiGroups:
- ""
resources:
- configmaps
- pods
- secrets
- endpoints
verbs:
- get
- list
- watch-
apiGroups:
- ""
resources:
- services
verbs:
- get
- list
- watch
- apiGroups:
- networking.k8s.io
resources:
- ingresses
verbs:
- get
- list
- watch
- apiGroups:
- networking.k8s.io
resources:
- ingresses/status
verbs:
- update-
apiGroups:
- networking.k8s.io
resources:
- ingressclasses
verbs:
- get
- list
- watch- apiGroups:
- ""
resourceNames:
- ingress-controller-leader resources:
- configmaps
verbs:
- get
- update
- apiGroups:
- ""
resources:
- configmaps
verbs:
- create-
apiGroups:
- ""
resources:
- events
verbs:
- create
- patch
---
apiVersion: rbac.authorization.k8s.io/v1
kind: RoleBinding
metadata:
labels:
app.kubernetes.io/component: controller
app.kubernetes.io/instance: ingress-nginx
app.kubernetes.io/name: ingress-nginx
name: ingress-nginx
namespace: ingress-nginx
roleRef:
apiGroup: rbac.authorization.k8s.io
kind: Role
name: ingress-nginx
subjects:
- kind: ServiceAccount
name: ingress-nginx
namespace: ingress-nginx
---
apiVersion: rbac.authorization.k8s.io/v1
kind: ClusterRole
metadata:
labels:
app.kubernetes.io/component: controller
app.kubernetes.io/instance: ingress-nginx
app.kubernetes.io/name: ingress-nginx
name: ingress-nginx
rules:-
apiGroups:
- ""
resources:
- configmaps
- endpoints
- nodes
- pods
- secrets
- namespaces
verbs:
- list
- watch
- apiGroups:
- ""
resources:
- nodes
verbs:
- get
- apiGroups:
- ""
resources:
- services
verbs:
- get
- list
- watch
- apiGroups:
- networking.k8s.io
resources:
- ingresses
verbs:
- get
- list
- watch-
apiGroups:
- ""
resources:
- events
verbs:
- create
- patch
- apiGroups:
- networking.k8s.io
resources:
- ingresses/status
verbs:
- update
- apiGroups:
- networking.k8s.io
resources:
- ingressclasses
verbs:
- get
- list
- watch
---
apiVersion: rbac.authorization.k8s.io/v1
kind: ClusterRoleBinding
metadata:
labels:
app.kubernetes.io/component: controller
app.kubernetes.io/instance: ingress-nginx
app.kubernetes.io/name: ingress-nginx
name: ingress-nginx
roleRef:
apiGroup: rbac.authorization.k8s.io
kind: ClusterRole
name: ingress-nginx
subjects:-
kind: ServiceAccount
name: ingress-nginx
namespace: ingress-nginx
</code></pre>
Start the deployment of the manifest.
<pre class="codeWrap"><code>kubectl apply -f ingress-service-account.yaml</code></pre>
Create Configmap
Through this configmap, you possess the capabilities to alter Nginx settings at will. It enables you to determine custom headers along with regulating the majority of Nginx settings. Consult the official community documentation for a comprehensive list of supported configurations.
Create a file titled configmap.yaml and populate it with the following contents.
<pre class="codeWrap"><code>---
apiVersion: v1
data:
allow-snippet-annotations: "true"
kind: ConfigMap
metadata:
labels:
app.kubernetes.io/component: controller
app.kubernetes.io/instance: ingress-nginx
app.kubernetes.io/name: ingress-nginx
name: ingress-nginx-controller
namespace: ingress-nginx
</code></pre>
Then you can create the configmap.
<pre class="codeWrap"><code>kubectl apply -f configmap.yaml</code></pre>
Create Ingress Controller & Admission Controller Services
Create a file labeled services.yaml and copy the following content into it.
<pre class="codeWrap"><code>---
apiVersion: v1
kind: Service
metadata:
labels:
app.kubernetes.io/component: controller
app.kubernetes.io/instance: ingress-nginx
app.kubernetes.io/name: ingress-nginx
name: ingress-nginx-controller
namespace: ingress-nginx
spec:
externalTrafficPolicy: Local
ipFamilies:
- IPv4
ipFamilyPolicy: SingleStack
ports:
- appProtocol: http
name: http
port: 80
protocol: TCP
targetPort: http
- appProtocol: https
name: https
port: 443
protocol: TCP
targetPort: https
selector:
app.kubernetes.io/component: controller
app.kubernetes.io/instance: ingress-nginx
app.kubernetes.io/name: ingress-nginx
type: LoadBalancer
---
apiVersion: v1
kind: Service
metadata:
labels:
app.kubernetes.io/component: controller
app.kubernetes.io/instance: ingress-nginx
app.kubernetes.io/name: ingress-nginx
name: ingress-nginx-controller-admission
namespace: ingress-nginx
spec:
ports:
- appProtocol: https
name: https-webhook
port: 443
targetPort: webhook
selector:
app.kubernetes.io/component: controller
app.kubernetes.io/instance: ingress-nginx
app.kubernetes.io/name: ingress-nginx
type: ClusterIP
</code></pre>
After this you create the services.
<pre class="codeWrap"><code>kubectl apply -f services.yaml</code></pre>
The mechanism ingress-nginx-controller sets up a Loadbalancer in the respective cloud platform you are deploying to.
Using the below-stated command, you can retrieve the IP/DNS of the load balancer.
<pre class="codeWrap"><code>kubectl --namespace ingress-nginx get services -o wide -w ingress-nginx-controller</code></pre>
Note: Every cloud provider offers unique annotations that aid in mapping static IP address along with other configs to the Loadbalancer. Check out GCP annotations here and AWS annotations here.
Create Ingress Controller Deployment
Create a file named deployment.yaml and duplicate the following content.
<pre class="codeWrap"><code>apiVersion: apps/v1
kind: Deployment
metadata:
labels:
app.kubernetes.io/component: controller
app.kubernetes.io/instance: ingress-nginx
app.kubernetes.io/name: ingress-nginx
name: ingress-nginx-controller
namespace: ingress-nginx
spec:
minReadySeconds: 0
revisionHistoryLimit: 10
selector:
matchLabels:
app.kubernetes.io/component: controller
app.kubernetes.io/instance: ingress-nginx
app.kubernetes.io/name: ingress-nginx
template:
metadata:
labels:
app.kubernetes.io/component: controller
app.kubernetes.io/instance: ingress-nginx
app.kubernetes.io/name: ingress-nginx
spec:
containers:
- args:
- /nginx-ingress-controller
- --publish-service=$(POD_NAMESPACE)/ingress-nginx-controller
- --election-id=ingress-controller-leader
- --controller-class=k8s.io/ingress-nginx
- --configmap=$(POD_NAMESPACE)/ingress-nginx-controller
- --validating-webhook=:8443
- --validating-webhook-certificate=/usr/local/certificates/cert
- --validating-webhook-key=/usr/local/certificates/key
env:
- name: POD_NAME
valueFrom:
fieldRef:
fieldPath: metadata.name
- name: POD_NAMESPACE
valueFrom:
fieldRef:
fieldPath: metadata.namespace
- name: LD_PRELOAD
value: /usr/local/lib/libmimalloc.so
image: k8s.gcr.io/ingress-nginx/controller:v1.1.1
imagePullPolicy: IfNotPresent
lifecycle:
preStop:
exec:
command:
- /wait-shutdown
livenessProbe:
failureThreshold: 5
httpGet:
path: /healthz
port: 10254
scheme: HTTP
initialDelaySeconds: 10
periodSeconds: 10
successThreshold: 1
timeoutSeconds: 1
name: controller
ports:
- containerPort: 80
name: http
protocol: TCP
- containerPort: 443
name: https
protocol: TCP
- containerPort: 8443
name: webhook
protocol: TCP
readinessProbe:
failureThreshold: 3
httpGet:
path: /healthz
port: 10254
scheme: HTTP
initialDelaySeconds: 10
periodSeconds: 10
successThreshold: 1
timeoutSeconds: 1
resources:
requests:
cpu: 100m
memory: 90Mi
securityContext:
allowPrivilegeEscalation: true
capabilities:
add:
- NET_BIND_SERVICE
drop:
- ALL
runAsUser: 101
volumeMounts:
- mountPath: /usr/local/certificates/
name: webhook-cert
readOnly: true
dnsPolicy: ClusterFirst
nodeSelector:
kubernetes.io/os: linux
serviceAccountName: ingress-nginx
terminationGracePeriodSeconds: 300
volumes:
- name: webhook-cert
secret:
secretName: ingress-nginx-admission
</code></pre>
Create the deployment.
<pre class="codeWrap"><code>kubectl apply -f deployment.yaml</code></pre>
To verify the functionality of the deployment, inspect the pod status.
<pre class="codeWrap"><code>kubectl get pods -n ingress-nginx</code></pre>
Nginx Ingress Controller Helm Deployment
If Helm is your preferred tool, the ingress controller can be deployed using the community helm chart. The ValidatingWebhookConfiguration is set to be disabled by default in values.yaml.
Move forward with deploying the helm chart, which will generate the namespace ingress-nginx if it doesn't already exist.
<pre class="codeWrap"><code>helm upgrade --install ingress-nginx ingress-nginx \
--repo https://kubernetes.github.io/ingress-nginx \
--namespace ingress-nginx --create-namespace
</code></pre>
Verify the success of the helm release.
<pre class="codeWrap"><code>helm list -n ingress-nginx</code></pre>
For reclaiming resources, proceed to uninstall the release.
<pre class="codeWrap"><code>helm uninstall ingress-nginx -n ingress-nginx</code></pre>
Map a Domain Name To Ingress Loadbalancer IP
The fundamental objective of Ingress rests on steering external traffic towards services operating on Kubernetes. Ideally, within projects, a DNS would be synchronized with the IP of the ingress controller Loadbalancer.
This coordination can be accomplished through the respective DNS provider along with the domain name in your possession.
Info: For applications exposed to the internet, it would comprise a public DNS pointing to the public IP of the load balancer. In the scenario of an internal application, it will likely be an organization's private DNS mapped to a private load balancer IP.
Single DNS Mapping
You possess the capability to directly ascribe a single domain as an A record to the load balancer IP. Through this, you can maintain solely one domain for the ingress controller and multifaceted path-based traffic routing.
For example,
<pre class="codeWrap"><code>www.example.com --> Loadbalancer IP</code></pre>
This approach also permits path-based routing.
Providing a few examples,
<pre class="codeWrap"><code>http://www.example.com/app1
http://www.example.com/app2
http://www.example.com/app1/api
http://www.example.com/app2/api
</code></pre>
Wildcard DNS Mapping
By mapping a wildcard DNS to the load balancer, you enable dynamic DNS endpoints via ingress.
Upon adding the wildcard entry to the DNS records, it's necessary to specify the needed DNS in the ingress object. The Nginx ingress controller will then handle routing to the relevant service endpoint.
Take the following two mappings as examples.
<pre class="codeWrap"><code>*.example.com --> Loadbalancer IP
*.apps.example.com --> Loadbalancer IP
</code></pre>
This method allows multiple dynamic subdomains via a singular ingress controller. Each DNS can maintain a unique path-based routing.
To illustrate, here are a few examples.
<pre class="codeWrap"><code>#URL one
http://demo1.example.com/api
http://demo1.example.com/api/v1
http://demo1.example.com/api/v2
#app specific urls
http://grafana.apps.example.com
http://prometheus.apps.example.com
#URL two
http://demo2.apps.example.com/api
http://demo2.apps.example.com/api/v1
http://demo2.apps.example.com/api/v2
</code></pre>
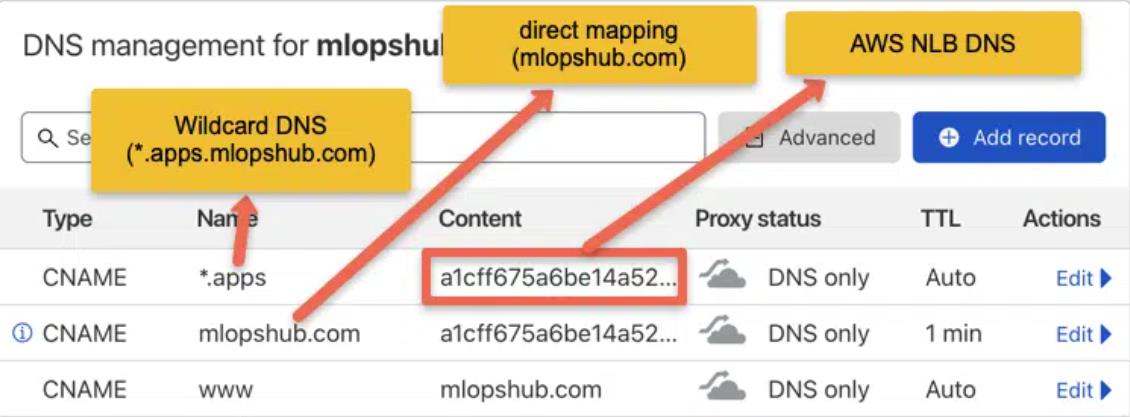
For demonstration objectives, I've aligned a wildcard DNS to the LoadBalancer IP. Depending on your DNS provider, the DNS record can be added.
The following image exhibits the DNS records employed for this blog's demonstration. Since EKS was used, rather than a LoadBalancer IP, there's a DNS of a network load balancer endpoint—a CNAME. In a GKE situation, an IP will be given, and in that case, the creation of an A record is necessary.
Deploy a Demo Application
To assess ingress, we'll roll out a demo application and append a ClusterIp service to it. Without ingress, this application will only be reachable within the cluster.
Step 1: Create a namespace named dev
<pre class="codeWrap"><code>kubectl create namespace dev /code></pre>
Step 2: Create a file named hello-app.yaml
Step 3: Copy the following contents and save the file.
<pre class="codeWrap"><code>apiVersion: apps/v1
kind: Deployment
metadata:
name: hello-app
namespace: devspec:
selector:
matchLabels:
app: hello
replicas: 3
template:
metadata:
labels:
app: hello
spec:
containers:
- name: hello
image: "gcr.io/google-samples/hello-app:2.0"
</code></pre>
Step 4: Create the deployment through kubectl
<pre class="codeWrap"><code>kubectl create -f hello-app.yaml</code></pre>
Examine the status of deployment.
<pre class="codeWrap"><code>kubectl get deployments -n dev</code></pre>
Step 5: Create a file named hello-app-service.yaml
Step 6: Copy the following contents and save the file.
<pre class="codeWrap"><code>apiVersion: v1
kind: Service
metadata:
name: hello-service
namespace: dev
labels:
app: hello
spec:
type: ClusterIP
selector:
app: hello
ports:
- port: 80
targetPort: 8080
protocol: TCP
</code></pre>
Step 7: Initiate the service with the assistance of kubectl.
<pre class="codeWrap"><code>kubectl create -f hello-app-service.yaml</code></pre>
Create Ingress Object for Application
Let's now formulate an ingress object to link with our hello app using a DNS. An ingress object fundamentally creates a setup for routing regulations.
If you're contemplating how the ingress object links with the Nginx controller, the answer lies in the ingress controller pod. It connects to the Ingress API to review any rules, subsequently updating its nginx.conf in alignment.
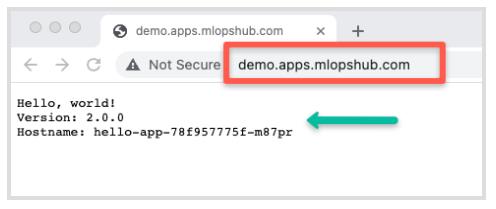
Since I've mapped wildcard DNS (*.apps.mlopshub.com) with the DNS provider, I'll utilize demo.apps.mlopshub.com as the marker pointing towards the hello app service.
Step 1: Create a file named ingress.yaml
Step 2: Copy the following contents and save the file.
Substitute demo.apps.mlopshub.com with your domain name. Moreover, we're creating this ingress object within the dev namespace given that the hello app is operational within the dev namespace.
<pre class="codeWrap"><code>apiVersion: networking.k8s.io/v1
kind: Ingress
metadata:
name: test-ingress
namespace: dev
spec:
ingressClassName: nginx
rules:
- host: "demo.apps.mlopshub.com"
http:
paths:
- pathType: Prefix
path: "/"
backend:
service:
name: hello-service
port:
number: 80
</code></pre>
Step 3: Describe the created ingress object to verify the configurations.
<pre class="codeWrap"><code>kubectl describe ingress -n dev</code></pre>
Now, if I attempt to access the demo.apps.mlopshub.com domain, I can access the hello app as displayed below. (Ensure that you replace it with your domain name.)
TLS With Nginx Ingress
It is feasible to configure TLS certificates for each ingress object. At the ingress controller level, TLS terminates.
The following image shows the ingress TLS configuration. As a secret object, the TLS certificate must be added.

Conclusion
Throughout this article, we've acquired knowledge about setting up the Nginx ingress controller. Initiating the process is relatively straightforward. Nonetheless, for project execution, certain steps necessitate your attention- delve into all Nginx configurations and calibrate them to align with specifications.
The Nginx controller configmap facilitates customization of all Nginx settings—void of the necessity for redeployment of the controller.


Facing Challenges in Cloud, DevOps, or Security?
Let’s tackle them together!
get free consultation sessions
We will contact you shortly.
