

Getting Started With Jenkins
Today, we'll talk about the foundation of CI/CD, and how to use and get started with Jenkins.
Within this detailed, step-by-step guide to initial setup with Jenkins, you'll grasp the essential principles that form the foundation of CI/CD, understand how to construct a pipeline and gain insight into the appropriate circumstances and settings to utilize Jenkins.
Introduction
Jenkins, boasting over a decade of prominence in software automation, owes its sustained relevance to its feature-packed toolset and adaptability. Although the field now hosts numerous remarkable competitors, Jenkins continues to stand as one of the pioneers. However, mastering Jenkins can be a steep climb due to its substantial learning curve. The vast ecosystem of Jenkins plugins and features can quickly become overwhelming.
In this article, we aim to dissect this complexity, starting by getting to grips with the foundational theories and notions that anchor Jenkins. Based on this foundation, we'll delve into how to assemble a simple pipeline in Jenkins to build and test an application. Finally, we will progress this introductory example into a more intricate project and explore some viable alternatives to Jenkins.
What Is Jenkins? Fundamentals and Concepts
Jenkins is a software automation service that facilitates the scripting of tasks such as builds. One key aspect of Jenkins that sparks interest is its ability to formulate a pipeline, which is a distinct sequence of arranged tasks. Prior to crafting a pipeline in Jenkins, it's crucial that we first understand what a pipeline entails and its utility. This understanding commences with a journey through the history of software development.
Big Bang Integration
Prior to the advent of automation, the necessity to build and evaluate our applications manually on our local systems was unavoidable. After clearing our local tests, changes would be uploaded to a remote repository, allowing them to integrate with alterations introduced by other developers.
On a pre-set schedule - usually, as we near a product launch - the Quality Assurance (QA) team would step in to test the codes residing in our remote repository. Although our local tests might have successfully passed prior to committing them, and the local tests from other developers also passed ahead of their commitments, there was never a concrete guarantee that the consolidated changes would function effectively. Instead, the possibility always remained that we needed to wait until QA completed a full sweep of all integrated tests.
This decisive occasion was typically ascribed as the 'Big Bang.' In the probable scenario of the tests not going as planned, our next course of action entailed investigating all of the committed changes to identify the potentially problematic commits.
Continuous Integration
The practice of executing tests and validating code after every commit is referred to as Continuous Integration (CI). As its name suggests, CI differentiates itself from Big Bang integration by continuously integrating and validating code functionality.
Big Bang integration might work for small projects or prototypes, but it poses considerable obstacles in the context of medium- or large-scale projects. Preferably, we aim to determine whether our tests succeed when merging code with the remote repository.
This necessitates two key alterations to our approach:
- Test automation
- Implementation of automated tests Post-Check-in
Automated tests could be created for a Big Bang project, but they are not obligatory. Nevertheless, for our updated process to function seamlessly, automation is essential. Manually checking tests for any project receiving multiple commits daily would be highly inefficient. Instead, an automatically executable test suite is required, capable of running whenever and wherever needed.
The second prerequisite entails activating our automated tests as soon as a commit is made to the remote repository. This requires a particular service (either external or co-located with our repository) to check out the repository following each commit, execute the tests, and report their success or failure. While this procedure could run periodically, ideally, it should operate with each commit, allowing us to pinpoint the precise cause of test suite failure.
By implementing CI, we are no longer required to wait for an undetermined future moment to evaluate whether our code operates as intended. Instead, we are constantly informed of its status and can promptly trace back the origin of a failure should the code cease working. CI represents a significant advancement in software automation. Today, the vast majority of projects capitalize on CI to some extent, thereby ensuring that each commit does not adversely impact the build. While constituting a notable enhancement, this shift only equates to half the journey taken by our code from commitment to delivery.
Continuous Delivery
Studying our manual build process, we correctly identified a chance to automate the build and test phases of our workflow; however, this only comprises a small segment of the overall process. For the majority of software, our tasks extend beyond build and unit tests; we also execute more advanced tests (like integration and system tests), deliver our end product to our clients, and perform a multitude of intermediate steps as well.
Following CI's mindset, it prompts us to ask the question:
Why not automate the overall business process, from build to delivery, and sequentially execute each process phase until our product is automatically delivered to the consumer?
This transformative approach is called Continuous Delivery (CD). Similar to CI, CD integrates our code continuously as we make commits. However, in contrast with CI, CD doesn't stop at the completion of unit tests. Instead, CD challenges us to automate every phase of our business procedure until the final product is automatically dispatched to the customer.
This sequence of automated steps is referred to as a pipeline. A pipeline is comprised of stages, which are clusters of steps executed in parallel. One stage can only start once all the steps in the preceding stage have successfully finished.
While the specific stages and steps within a CI/CD pipeline can differ, they all share a common definition: they're simply abstractions of the business process that a software product must finalize before customer delivery. Regardless of CI/CD, each software delivery incorporates a delivery process; we simply execute it manually. CI/CD does not bring anything new to the process; it merely automates each stage enabling the pipeline to be executed automatically.
CI/CD is a comprehensive subject and can feel daunting initially, but it can be encapsulated into several key notions:
- A pipeline represents an abstraction of the business process we employ to deliver a product.
- A pipeline consists of a sequenced set of stages.
- A stage is composed of a set of steps that are run concurrently.
- A stage cannot start execution until all steps in the prior stage have been completed.
- A trigger constitutes the first event within a pipeline that initiates the first stage (i.e., a repository commit).
- A pipeline is executed following every commit to a repository.
- A pipeline's deliverable is not delivered to a customer unless all stages are successful.
This last point is where CI/CD excels: We are aware that any artifact delivered to a customer is indeed the last functioning artifact that successfully cleared the pipeline. Likewise, we know that whenever a commit results in a passing artifact, it’s automatically delivered to the customer (eliminating any waiting period for client delivery or the need for multiple commits to obtain the most recent delivery).
CI/CD and Jenkins
At this juncture, we have a basic comprehension of CI/CD and its significance. While discussing CI/CD, we omitted a crucial aspect: what exactly initiates the pipeline operation?
Whatever the remaining element is, it needs to possess the capability to:
- Scan a remote repository for commits
- Clone the most recent code from a repository
- Define a pipeline and its constituent stages via scripts and other automated mechanisms
- Execute the automated steps in the pipeline
- Report the outcome of a pipeline execution (for instance, pass or fail).
- Deliver the final artifacts to some internal or external location
Here is where Jenkins becomes instrumental. Jenkins serves as an automation server designed to perform all the aforementioned steps. Though Jenkins is an exceedingly robust automation service capable of automating more than just CI/CD (Jenkins could theoretically automate virtually any process), it encompasses the tools required to establish a functional CI/CD pipeline and trigger its execution following a repository commit.
Jenkins has a long-established history — and recording all its nuances would require an extensive series — but fundamentally, Jenkins is a potent CI/CD tool employed by many top-tier software companies. Its comprehensive set of features and plugins, backed by its proven reliability, has solidified its position as a mainstay in the software automation community.
Jenkins Builds: Setting up a Pipeline
The primary objective of this tutorial is to establish a basic pipeline using Jenkins. Although most Jenkins pipelines (or any pipeline in general) will comprise numerous, potentially intricate stages, we will commence by creating a minimally viable pipeline containing a single stage. Subsequently, we will partition our single-stage pipeline into a two-stage pipeline. From that point, we will explore how to use this elementary pipeline as a foundational structure for a production-ready pipeline.
Setting up Jenkins
In order to set up Jenkins, we must complete three steps:
- Install Docker
- Build and launch the Jenkins Docker container
- Configure Jenkins
- Installing Docker
Prior to installing Docker, we need to create a DockerHub account. DockerHub can be considered Docker's parallel to GitHub, serving as a repository of preconfigured container images like Ubuntu, MongoDB, and Jenkins. We will utilize these preconfigured containers as an initial point for installing Jenkins, as well as a starting point for the projects that we construct in Jenkins.
To create a DockerHub account:
- Proceed to the DockerHub Sign-Up page.
- Input your email along with your chosen username and password, or connect to a Google or GitHub account.
- Submit your account details.
- Validate your account via the email sent to the entered email address.
- Log in to your newly created DockerHub account.
For our inaugural Jenkins project, the default, Personal account will prove adequate since it permits us to download 200 containers every 6 hours (as per the situation when this was written). If we were creating a Jenkins pipeline for a commercial product or a team project, we should consider an upgraded account, like Pro or Business.
After creating a DockerHub account, we can install the Docker Desktop application. Docker Desktop is a graphical application that enables us to construct Docker images and start them as containers. Docker Desktop is compatible with Windows, Mac, and Linux.
For comprehensive instructions on how to install Docker Desktop on these platforms, refer to the respective Docker pages:
Following the installation of Docker Desktop, we must log in to our DockerHub account to link it to our Docker Desktop installation:
- Launch Docker Desktop.
- Click the Login link.
- Login to DockerHub in the newly opened browser tab.
- Return back to Docker Desktop after logging in.
- Accept the license agreement.
Once our account is successfully linked, we are prepared to fetch the Docker Jenkins image and start the container.
Running the Jenkins Docker Container
Now that Docker is configured, we are ready to construct a new Jenkins image containing the necessary packages and execute the image as a container. In this section, we'll illustrate the process using the Windows setup as an example. The process for macOS and Linux is akin but has slight variations. For more details on setting up the Jenkins container on macOS or Linux, please refer to Installing Jenkins with Docker on macOS and Linux.
Firstly, we need to devise a bridge network for Jenkins with the following command:
<pre class="codeWrap"><code>docker network create jenkins </code></pre>
Subsequently, we need to run a docker:dinb image:
<pre class="codeWrap"><code>docker run --name jenkins-docker --rm --detach ^
--privileged --network jenkins --network-alias docker ^
--env DOCKER_TLS_CERTDIR=/certs ^
--volume jenkins-docker-certs:/certs/client ^
--volume jenkins-data:/var/jenkins_home ^
--publish 2376:2376 ^ docker:dind </code></pre>
The docker:dind (where dind denotes Docker-in-Docker) is an image supplied by Docker, which enables us to execute Docker within a Docker container. Our container must have Docker installed to run our pipeline since Jenkins will initiate a new Docker container within the Jenkins container to carry out the stages of our pipeline.
Now, we need to create a Docker image based on the Jenkins image. This custom image incorporates all the features, such as the Docker CLI, which is requisite for Jenkins to run our pipeline. To create this image, we can save the following Dockerfile in the current directory:
<pre class="codeWrap"><code>FROM jenkins/jenkins:2.414.3-jdk17
USER root
RUN apt-get update && apt-get install -y lsb-release
RUN curl -fsSLo /usr/share/keyrings/docker-archive-keyring.asc \
https://download.docker.com/linux/debian/gpg
RUN echo "deb [arch=$(dpkg --print-architecture) \
signed-by=/usr/share/keyrings/docker-archive-keyring.asc] \
https://download.docker.com/linux/debian \
$(lsb_release -cs) stable" > /etc/apt/sources.list.d/docker.list
RUN apt-get update && apt-get install -y docker-ce-cli
USER jenkins
RUN jenkins-plugin-cli --plugins "blueocean docker-workflow"</code></pre>
Once the Dockerfile is saved, we can create a new image from it:
<pre class="codeWrap"><code>docker build -t myjenkins-blueocean:2.414.3-1 .</code></pre>
This command names the new image as myjenkins-blueocean (with a version of 2.414.3-1) and presumes the Dockerfile is in the current directory. Note that we can use any valid Docker image name of our preference. At the time of writing, a valid image name adheres to the following criteria:
The [name] must be valid ASCII and can incorporate lowercase and uppercase letters, digits, underscores, periods, and hyphens. It cannot start with a period or a hyphen and must not exceed 128 characters.
Finally, we can initiate our container with the following command:
<pre class="codeWrap"><code>docker run --name jenkins-blueocean --restart=on-failure --detach ^
--network jenkins --env DOCKER_HOST=tcp://docker:2376 ^
--env DOCKER_CERT_PATH=/certs/client --env DOCKER_TLS_VERIFY=1 ^
--volume jenkins-data:/var/jenkins_home ^ --volume jenkins-docker-certs:/certs/client:ro ^
--publish 8080:8080 --publish 50000:50000 myjenkins-blueocean:2.414.3-1</code></pre>
We can verify that our Jenkins container (named myjenkins-blueocean) is running:
- Open the Docker Desktop.
- Click the Containers tab on the left panel.
- Verify that the myjenkins-blueocean container is running.
The operating container will resemble the following in the Docker Desktop GUI:

At this point, our Jenkins container is set. The process to create the Jenkins container for Mac and Linux is comparable to that of Windows.
For more information, refer to the following pages:
- Installing Jenkins with Docker on Windows
- Installing Jenkins with Docker on macOS and Linux (linked above)
Configuring Jenkins
Once the Jenkins container is running, we have the ability to access the Jenkins User Interface (UI) via our browser at http://localhost:8080. The Jenkins welcome interface will present a prompt asking for the Administrator password.
This password can be found and the Jenkins installation can be completed by following these steps:
- Launch Docker Desktop.
- Click on the Containers tab positioned on the left panel.
- Click on our active Jenkins container (myjenkins-blueocean).
- Select the Logs tab (this tab typically opens by default).
- Identify the lines in the log that resemble the following:
<pre class="codeWrap"><code>2023-10-31 11:25:45 *************************************************************
2023-10-31 11:25:45 *************************************************************
2023-10-31 11:25:45 *************************************************************
2023-10-31 11:25:45 2023-10-31 11:25:45 Jenkins initial setup is required. An admin user has been created and a password generated.2023-10-31 11:25:45 Please use the following password to proceed to installation:
2023-10-31 11:25:45 2023-10-31 11:25:45 080be1abb4e04be59a0428a85c02c6e9
2023-10-31 11:25:45 2023-10-31 11:25:45 This may also be found at: /var/jenkins_home/secrets/initialAdminPassword
2023-10-31 11:25:45 2023-10-31 11:25:45 *************************************************************
2023-10-31 11:25:45 *************************************************************
2023-10-31 11:25:45 ************************************************************* </code></pre>
In this instance, the administrative password is 080be1abb4e04be59a0428a85c02c6e9.
- Insert this password into the Jenkins welcome page (located at http://localhost:8080).
- Click the Continue button.
- Click the Install Suggested Plugins button on the Customize Jenkins page.
- Wait for the Jenkins setup to complete.
- Enter a desired username, password, email, and full name.
- Click the Save and Continue button.
- Enter http://localhost:8080/ (the default value) on the Instance Configuration page.
- Click the Save and Finish button.
- Click the Start using Jenkins button.
At this juncture, Jenkins is running and configured, and we are set to create our Jenkins pipeline. Note that this was a simple installation, and the installation for a business venture or a broader team would be different. For instance, extra plugins may be requisite to enable our team to log in, or we might have more security considerations—such as not operating Jenkins on HTTP or on localhost:8080. For extra details on how to establish a Jenkins container, please refer to the Jenkins Docker Installation page.
Creating a Pipeline
The next step we need to take is to create a pipeline for executing our build. Although pipelines can be intricate, contingent on the business process being automated, it's advisable to start on a small scale and incrementally expand. Staying true to this principle, we'll initiate with a basic pipeline: A single stage with one step that employs mvn clean package to generate an artifact. Subsequently, we will segment the pipeline into dual stages: a build stage and a test stage.
To achieve this, we will:
- Install the Docker Pipeline plugin, if not pre-installed.
- Append a Jenkinsfile to our project.
- Create a pipeline in Jenkins that utilizes our project.
- Set up our pipeline to automatically build when alterations to our project repository occur.
- Separate our single-stage pipeline into a build and test stage.
Installing the Pipeline Plugin
On occasion, the Docker Pipeline plugin (which is requisite for creating our pipeline) may not be installed by default.
To verify if the plugin is installed, we need to execute the following steps:
- Select Manage Jenkins on the left panel.
- Click the Plugins button located under System Configuration.
- Select Installed plugins on the left panel.
- Search for docker pipeline in the search installed plugins field.
- Ensure the Docker Pipeline plugin is enabled.
If the Docker Pipeline plugin is installed, we can skip the installation steps.
If the plugin isn't installed, we can install it with the following steps:
- Click Manage Jenkins on the left panel.
- Select the Plugins button under System Configuration.
- Click Available plugins on the left panel.
- Search for docker pipeline in the search available plugins field.
- Tick the checkbox for the Docker Pipeline plugin.
- Click the Install button located at the top right.
- Await the completion of the download and installation process.
With the plugin installed, we are equipped to start developing our pipeline.
Adding a Simple Jenkinsfile
Prior to constructing our pipeline, the prerequisite is to add a Jenkinsfile into our project. A Jenkinsfile is similar to a Dockerfile but it manages pipeline configurations as opposed to Docker image configurations. It is a setup file located at the topmost level of our repository, ensuring the pipeline that Jenkins will execute when our project is verified.
Do note that this divided section will use the Jenkins-example-project as a reference project. Being publicly accessible, this repository can be used and built from any point of Jenkins deployment, regardless of whether Jenkins is deployed on our machine.
We begin with a simple Jenkinsfile (located in the root directory of the project we intend to build) that formulates a pipeline with a single step (Build):
<pre class="codeWrap"><code>pipeline {
agent {
docker {
image 'maven:3.9.5-eclipse-temurin-17-alpine'
args '-v /root/.m2:/root/.m2'
}
}
stages {
stage('Build') {
steps {
sh 'mvn clean package'
}
}
}
}</code></pre>
In a Jenkins file, the agent section configures where the pipeline will execute. Here, our pipeline is programmed to execute on a Docker container run from the maven:3.9.5-eclipse-temurin-17-alpine Docker image. The -v /root/.m2:/root/.m2 argument produces a dual mapping between the /root/.m2 directory inside the Docker container and the /root/.m2 directory within our Docker host. As per Jenkins documentation:
This args parameter creates a reciprocal mapping between the /root/.m2 directories in the short-lived Maven Docker container and that of your Docker host’s filesystem. You do this mainly to ensure that the artifacts for building your Java application, which Maven downloads while your Pipeline is being executed, are retained in the Maven repository after the Maven container is gone. This prevents Maven from downloading the same artifacts during successive Pipeline runs.
Lastly, the stages are created under the stages section and define our single stage: Build. This stage comprises a single step that initiates the shell command mvn clean package. Detailed information regarding the comprehensive suite of Jenkinsfile syntax can be obtained from the Pipeline Syntax page and exhaustive details about the mvn clean package command are available in the Maven in 5 Minutes tutorial.
Creating the Pipeline
With our Jenkinsfile established, we're all set to create a pipeline that will utilize this Jenkinsfile to execute a build.
To configure the pipeline, it's necessary to carry out the following steps:
- Go to the Jenkins Dashboard page (http://localhost:8080/).
- Click + New Item in the left panel.
- Input a name for the pipeline (like Example-Pipeline).
- Select Multibranch Pipeline.
- Click the OK button.
- Click Add Source under the Branch Sources section.
- Choose GitHub.
- Input the URL of the repository to construct in the Repository HTTPS URL field (for example, https://github.com/albanoj2/jenkins-example-project)
- Click on the Validate button.
- Ensure that the message Credentials are okay. Connected to [project-url] is displayed.
- Click on the Save button.
Saving the pipeline configuration will start the initial execution of the pipeline. To see our most recent execution, we need to head to the Example-Pipeline dashboard by selecting the Example-Pipeline link in the pipeline table on the main Jenkins page (http://localhost:8080):

The Jenkins dashboard is structured in a hierarchical order that looks like this:
Main Dashboard → Pipeline → Branch
In this context, Example-Pipeline is the webpage that displays data about our freshly created pipeline. Within this page is a branch table featuring a row for every branch we monitor from our repository. In our case, we are only monitoring the master branch, but if we were tracking other branches, we would see multiple rows for each of our branches:

Every tracked branch operates according to the Jenkinsfile for that specific branch. It's conceivable that the pipeline for one branch may vary from the pipeline for another as their Jenkinsfiles might be different. We mustn't assume that the execution of every pipeline under the Example-Pipeline pipeline will be identical.
We can also monitor Pull Requests (PR) in our repository, similar to branches: For every PR we monitor, a new row will be added to the PR table (which can be accessed by hitting the Pull Requests link adjacent to the Branches link above the table). This enables us to view the pipeline executions for each PR. For more insight into tracking branches and PRs, refer to the Jenkins Pipeline Branches and Pull Requests page.
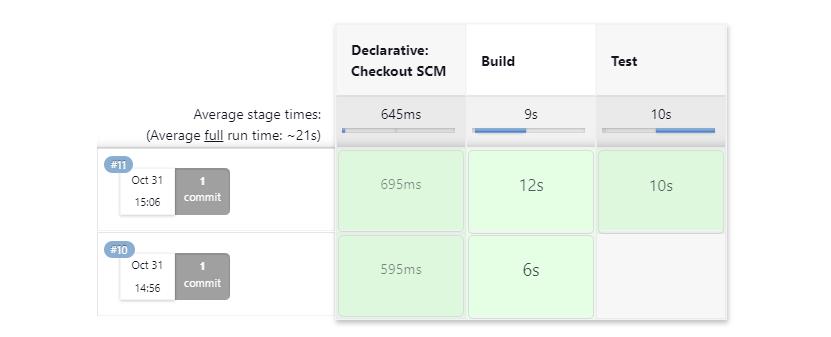
If we click on the master branch, the master branch page shows us that both stages of our pipeline (and hence, the complete pipeline) were completed successfully.
Although we only defined a single stage (Build) in our pipeline, Jenkins will subtly add a stage (Checkout SCM, or Software Configuration Management), which checks out our repository. The moment the repository is checked out, Jenkins runs our pipeline stages against the local cloned version.
Running the Pipeline Automatically
By default, our pipeline will only initiate when executed manually.
For automatic pipeline execution, we are presented with two choices:
- Implement regular repository scans
- Create a webhook
To implement regular repository scans, we can modify the pipeline configuration:
- Go to the Jenkins Dashboard.
- Click on the Example-Pipeline pipeline.
- Click on the Configuration tab located in the left panel.
- Tick the Periodically if not otherwise run box.
- Adjust the Interval to the desired amount.
- Click the Save button.
This will result in regular polling of the repository and executing the pipeline if a change is identified (unless an execution has been manually started already). Creating a webhook facilitates more synchronization and doesn't necessitate polling but requires slightly more configuration.
Running Tests Separately
Although a single-stage pipeline serves as a good starting point, it falls short in realistic production environments. To demonstrate how a multi-stage pipeline works, we're going to subdivide our existing build stage into two stages: a build stage and a test stage.
In our current build stage, we created and tested our project using the mvn clean package command. For our two-stage pipeline, we'll skip our tests in the build stage using the -DskipTests=true Maven parameter, and insert a second stage that solely runs our tests using the mvn test command.
The application of this in our project brings about the following Jenkinsfile:
<pre class="codeWrap"><code>pipeline {
agent {
docker {
image 'maven:3.9.5-eclipse-temurin-17-alpine'
args '-v /root/.m2:/root/.m2'
}
}
stages {
stage('Build') {
steps {
sh 'mvn clean package -DskipTests=true'
}
}
stage('Test') {
steps {
sh 'mvn test'
}
post {
always {
junit 'target/surefire-reports/*.xml'
}
}
}
}
}</code></pre>
All changes to our Jenkinsfile, but one, is familiar: besides running mvn test, we also create a post-processing step using the post section. In this section, we lay out a post-processing step that always runs and informs the Jenkins JUnit Plugin about the location of our JUnit test artifacts. The JUnit Plugin comes pre-installed and offers a visual representation of the count of tests that have passed or failed over time.
When our next build is executed (which should be detected automatically, due to our SCM trigger modification), we note the addition of a new stage, Test, to our Example-Pipeline master page. Note that since our previous build did not include this stage, it appears grayed out.
Looking at the top right of the same page, we see a graph representing our tests over time.
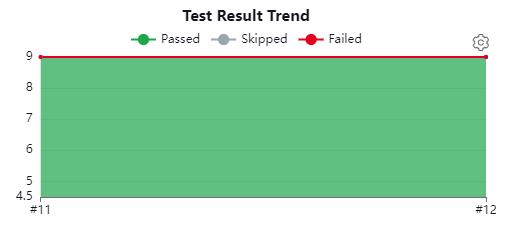
In our example project, there are nine tests, so our graph remains constant at nine tests. If we only have a single pipeline execution incorporating the JUnit Plugin, then we might not see this graph filled as above. As we carry out more executions, we will begin to notice the graph progressively fill over time.
Jenkins Features: Extending the Jenkins Pipeline
While our sample pipeline provides a good starting point, for medium- to large-scale applications it may not be adequate, and it merely gives a glimpse into the potential of Jenkins pipelines.
As we start building more intricate pipelines, we'll need to incorporate more sophisticated features, such as:
- Deploying artifacts to artifact repositories
- Deploying Docker images to a container image repository
- Establishing connections to external services using credentials and authentication
- Utilizing advanced UIs, like Blue Ocean
- Building and testing applications in varying environments and operating systems
- Building and testing applications concurrently across multiple worker nodes
- Standing up complex test and deployment environments in Kubernetes
- Limiting access to designated administrators
The array of possibilities is virtually limitless, but it's reasonable to say that realistic projects will need to develop from the basic project we have established here, adding more sophisticated features and advanced tooling to achieve their objectives.
Alternatives to Jenkins
Jenkins is a highly powerful tool boasting numerous benefits over its competitors, including:
- General automation tooling (beyond just CI/CD).
- A robust library of plugins.
- The ability to manage diverse projects in a singular location.
- A large user base and community knowledge.
- Proven and time-tested adoption.
Nevertheless, understanding its alternatives and where they outperform Jenkins is crucial.
Here's a list of some of the most popular alternatives to Jenkins (though not comprehensive) along with some of their advantages when building a pipeline:
- GitHub Actions: GitHub Actions is GitHub's own CI/CD offering. Its major advantage over Jenkins lies in its integration directly into GitHub. This means a pipeline built in Actions (referred to as a workflow) can be accessed within the same GitHub repository where our code, issues, and Wikis reside. As a result, we can avoid managing a separate Jenkins server and can access all the data supporting our code in one location. Despite Jenkins possessing a broader range of plugins and integrations, GitHub Actions requires serious consideration if we plan to build a pipeline for code already stored in GitHub.
- GitLab CI/CD: Similar to GitHub Actions, GitLab CI/CD is the native pipeline builder for GitLab repositories. The advantages that GitLab CI/CD holds over Jenkins mirror those of GitHub Actions: all tools related to our pipelines are located in the same application where our code is stored. GitLab CI/CD should be given serious consideration when using GitLab as a remote repository. You can also learn how to auto-deploy Spring Boot apps with GitLab CI/CD.
Other alternatives common to Jenkins, which might be beneficial to explore when setting up a pipeline, include:
Even with Jenkins' numerous advantages, it's crucial to survey other options to discern which CI/CD solution best suits the task in question.
Conclusion
Jenkins has been a pioneer in software automation and CI/CD since its inception in 2011. However, delving right into Jenkins may rapidly become daunting. In this article, we explore the core principles of CI/CD and how to apply those concepts to develop a functional pipeline in Jenkins.
While this serves as a solid starting point, it merely touches upon what Jenkins can truly achieve. As we create increasingly complex projects and aspire to deliver more advanced products, we can utilize the knowledge gained here as a building block to efficiently and effectively deliver software via Jenkins.


Facing Challenges in Cloud, DevOps, or Security?
Let’s tackle them together!
get free consultation sessions
We will contact you shortly.
