

Demystifying Kubernetes HPA
In this article, we are going to explore horizontal pod autoscaling and how it works. We will also look into a hands-on use case.
In modern application development, running multiple containers in parallel is a common practice. Kubernetes is a widely used platform for managing and orchestrating these parallel clusters. It offers dynamic scaling of pods, which is its main advantage.
There are three types of autoscaling offered by Kubernetes:
- Horizontal Pod Autoscaling (HPA): Based on defined metrics, it automatically increases and decreases the number of pod replicas.
- Vertical Pod Autoscaling (VPA): To avoid resource waste, VPA offers capacity planning and choosing accurate resource sizes during deployment.
- Cluster Autoscaling: It automatically adds and removes worker nodes in cases when the cluster is reduced to fit the pods or a pod is in a pending scheduling state. It is common in cloud-based Kubernetes versions.
In this article, we’ll take an in-depth look at the first of these three, HPA. Specifically, we’ll explore what horizontal pod autoscaling is, how it works, and provide some examples of using HPA for autoscaling application pods on Kubernetes clusters.
In the last section, we will discuss some of the best practices for using horizontal pod autoscaling. The HPA can sometimes lead to resource waste. The main reason for this is that users reserve more CPU and memory space when creating the containers. Another reason is that the auto-scaling feature doesn’t deal with network, storage, or disk I/O usage. This results in poor allocation of resources. In the open-source versions, advanced machine-learning techniques and data aggregation methods for resource optimization are not available.
Introduction to HPA
In Kubernetes, the Replication Controller provides the opportunity to run multiple replicas of application pods. For this, you must configure the number of replica counts in deployment objects. The manual settings of pod replicas might not be a good option to meet the workload demands in the future. To optimize this, Kubernetes offers horizontal autoscaling of pods. Horizontal pod autoscaling, or HPA, scales up (increase) or down (decrease) the pod replicas based on a defined metric.
For instance, the metric can include pod CPU/memory utilization or the number of API calls. Using HPA pods can be added or removed during runtime. Note that HPA can only be used in situations where we need to run multiple instances. The pods should support auto-scaling or be stateless.
How HPA works
In every Kubernetes installation, there is support for an HPA resource and associated controller by default.
By default, Kubernetes installation comes with support for HPA resources. The HPA-configured metrics are continuously monitored by the HPA control and are then compared with the desired metric. On the basis of this comparison, a decision is being made about whether we want to scale up or down the number of replica pods.
To understand this concept, consider the following diagram:
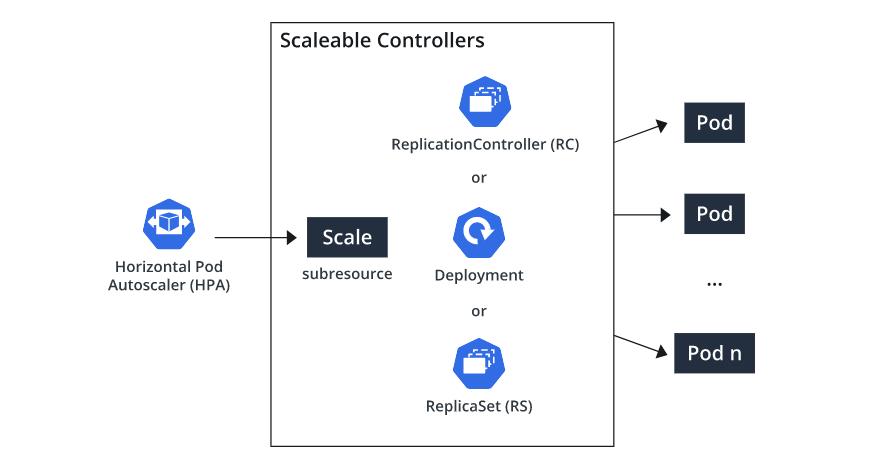
Here, the deployment and HPA resources work together to update the pods as per the target metric value. The deployment controller (pod controller) is going to scale up or down the number of replica pods. One common issue observed in such cases is thrashing. Thrashing is a phenomenon in which the HPA’s auto-scaling actions are performed before the workload finishes completing the last auto-scaling actions. One way to avoid thrashing is for the HPA control loop to choose a large number of pod count recommendations in the last few minutes.
Implementing HPA
Let’s take a hands-on example to configure the HPA. In this example, we will implement HPA to add auto-scaling features to our application based on CPU utilization.
There are two ways to create HPA resources: kubectl autoscale command or the HPA YAML resource file.
Let’s create a namespace for HPA testing using the kubectl command.
<pre class="codeWrap"><code>kubectl create ns hpa-test
namespace/hpa-test created</code></pre>
Use the following yaml file to create a deployment for HPA testing
<pre class="codeWrap"><code>cat example-app.yaml
apiVersion: apps/v1
kind: Deployment
metadata:
name: php-apache
namespace: hpa-test
spec:
selector:
matchLabels:
run: php-apache
replicas: 1
template:
metadata:
labels:
run: php-apache
spec:
containers:
- name: php-apache
image: k8s.gcr.io/hpa-example
ports:
- containerPort: 80
resources:
limits:
cpu: 500m
requests:
cpu: 200m
---
apiVersion: v1
kind: Service
metadata:
name: php-apache
namespace: hpa-test
labels:
run: php-apache
spec:
ports:
- port: 80
selector:
run: php-apache
kubectl create -f example-app.yaml
deployment.apps/php-apache created
service/php-apache created
</code></pre>
File and kubectl command snippet
Use kubectl get command to make sure the deployment is created and the pod is running
<pre class="codeWrap"><code>kubectl get deploy -n hpa-test
NAME READY UP-TO-DATE AVAILABLE AGE
php-apache 1/1 1 1 22s
</code></pre>
After the deployment is up and running, create the HPA using kubectl autoscale command. This HPA will maintain minimum 1 and max 5 replica pods of the deployment to keep the overall CPU usage to 50%
<pre class="codeWrap"><code>kubectl -n hpa-test autoscale deployment php-apache --cpu-percent=50 --min=1 --max=5
horizontalpodautoscaler.autoscaling/php-apache autoscaled </code></pre>
The declarative form to create the following Kubernetes resource:
<pre class="codeWrap"><code>apiVersion: autoscaling/v1
kind: HorizontalPodAutoscaler
metadata:
name: php-apache
namespace: hpa-test
spec:
scaleTargetRef:
apiVersion: apps/v1
kind: Deployment
name: php-apache
minReplicas: 1
maxReplicas: 10
targetCPUUtilizationPercentage: 50</code></pre>
Use the following command to get the current state of the HPA.
<pre class="codeWrap"><code></code>kubectl -n hpa-test get hpa
NAME REFERENCE TARGETS MINPODS MAXPODS REPLICAS AGE
php-apache Deployment/php-apache 0%/50% 1 5 1 17s
</pre>
The result shows that the application is running without any load and the number of active and desired pods is the same as the initial number.
<pre class="codeWrap"><code>kubectl -n hpa-test get hpa php-apache -o yaml
apiVersion: autoscaling/v1
kind: HorizontalPodAutoscaler
metadata:
name: php-apache
namespace: hpa-test
resourceVersion: "402396524"
selfLink: /apis/autoscaling/v1/namespaces/hpa-test/horizontalpodautoscalers/php-apache
uid: 6040eea9-0c2b-47de-9725-cfb78f17fe32
spec:
maxReplicas: 5
minReplicas: 1
scaleTargetRef:
apiVersion: apps/v1
kind: Deployment
name: php-apache
targetCPUUtilizationPercentage: 50
status:
currentCPUUtilizationPercentage: 0
currentReplicas: 1
desiredReplicas: 1
</code></pre>
Run the load test to check the HPA status. (press enter if you don’t see the command prompt)
<pre class="codeWrap"><code>kubectl -n hpa-test run -i --tty load-generator --rm --image=busybox --restart=Never -- /bin/sh -c "while sleep 0.01; do wget -q -O- http://php-apache; done"</code></pre>
Press CTRL-C to stop the load. After that get the HPA status.
<pre class="codeWrap"><code>kubectl -n hpa-test get hpa
NAME REFERENCE TARGETS MINPODS MAXPODS REPLICAS AGE
php-apache Deployment/php-apache 0%/50% 1 5 1 20h
kubectl -n hpa-test get hpa php-apache -o yaml
apiVersion: autoscaling/v1
kind: HorizontalPodAutoscaler
metadata:
name: php-apache
namespace: hpa-test
resourceVersion: "402402364"
selfLink: /apis/autoscaling/v1/namespaces/hpa-test/horizontalpodautoscalers/php-apache
uid: 6040eea9-0c2b-47de-9725-cfb78f17fe32
spec:
maxReplicas: 5
minReplicas: 1
scaleTargetRef:
apiVersion: apps/v1
kind: Deployment
name: php-apache
targetCPUUtilizationPercentage: 50
status:
currentCPUUtilizationPercentage: 0
currentReplicas: 1
desiredReplicas: 1
lastScaleTime: "2021-07-04T08:22:54Z"
</code></pre>
The HPA status shows that one pod replicas running and resources are back to normal.
Use the following command to clean up the resources.
<pre class="codeWrap"><code>kubectl delete ns hpa-test --cascade
namespace "hpa-test" deleted </code></pre>
Best Practices for Using HPA
When designing the application, keep in mind the horizontal scaling feature. To efficiently utilize HPA, use a microservices architecture, as this will help in running parallel pods. Avoid directly attaching the resources to the replication controller. For this, always use the HPA resource on deployment objects.
To track the configuration changes, always create the HPA resources in declarative form. This will allow us to take advantage of version control. When using HPA, always define the resource request. This will allow HPA to make better decisions when scaling the pods.
Limitations of HPA
HPA conflicts with the vertical pod autoscaler when it comes to CPU or memory metrics. To avoid scaling conflicts, HPA must use custom metrics when VPA is enabled. You need to check with your cloud service provider. Almost all cloud service providers feature a custom metrics adapter for HPA.
To implement HPA, your application should be running multiple instances in parallel, and the pods must be stateless. However, it can be used with stateful pods that depend on replica instances. Applications can face downtime as network, IOPS, and storage aren’t considered by HPA or VPA during scaling.
HPA often creates unused resources that consume memory, and this should be identified continuously. To efficiently manage these unused resources, we need third-party tools, as Kubernetes doesn’t provide any features to deal with them.
You can learn more about such resource optimization techniques to leverage Kubernetes autoscaling features.


Facing Challenges in Cloud, DevOps, or Security?
Let’s tackle them together!
get free consultation sessions
We will contact you shortly.
