

Kubernetes Init Container: All You Need to Know
Welcome to a comprehensive guide on Kubernetes Init containers. Whether you are curious about the common use cases, or init container best practices, we’ve got you covered.
Kubernetes stands out as a tool for efficiently overseeing and expanding containerized applications. It presents a sturdy system for automating the deployment, scaling, and administration of containers across a node cluster. Among the noteworthy attributes of Kubernetes lies the significance of Init Containers.
In this article, we’ll delve into a comprehensive exploration of Init Containers. We’ll try to understand their essence, functionality, and the benefits they steer into the realm of containerized applications.
Kubernetes Init Container – Basic Concepts
In the Kubernetes environment, pods exhibit a collaborative spirit by accommodating more than one container. They all unify their efforts to achieve a shared objective. An intriguing element in this pod synergy is the Init Container, a specialized container that initiates and completes its tasks before the primary containers within the pod kick into action.
The Init Container proves instrumental in setting up prerequisites, executing initialization processes, or configuring dependencies. It is crucial for the flawless functioning of the main application containers.

To illustrate this concept with a practical scenario, consider an application requiring a confidential secret to establish a connection with an API. Incorporating this secret directly into the application or utilizing Kubernetes secrets may pose challenges due to compliance considerations.
This is where Init Container comes to the rescue. You can employ an Init Container to fetch the required secret from a secure management service like Vault or AWS Secrets Manager and seamlessly deploy it in a designated location within the pod.
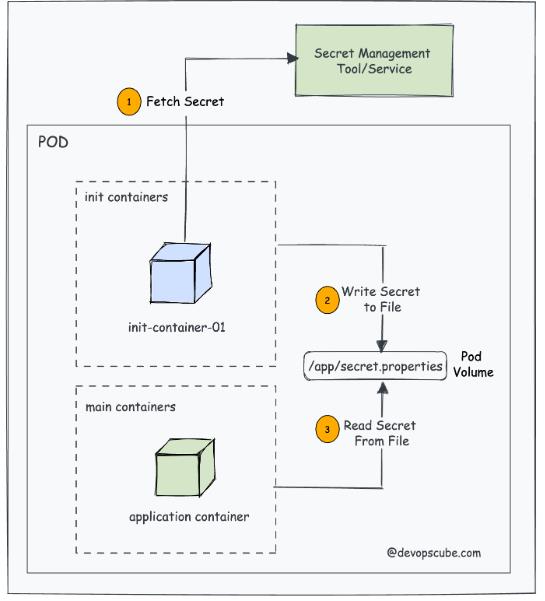
Remember, this location becomes an accessible repository for the application container, ensuring that when the application pod initiates, it promptly gains access to the requisite secret for a seamless connection to the API. Moreover, Init Containers serve as guardians of proper configuration and initialization. They ensure your applications are ready for a smooth start by addressing complex setup needs before activation.
Kubernetes Init Container – Workflow
Before we proceed toward complex details of init containers, let's unravel the mechanics governing their operation.
- The kubelet takes charge of executing init containers in the sequence outlined in the Pod's specifications. It ensures that each container accomplishes its task before the next initiation. This signifies a sequential execution, allowing only one init container to run at any given time.
- Init Containers spring into action before the primary application containers kick off their processes.
- All init containers undergo execution once more to ensure their tasks are completed, and if the pod should experience a restart.
- In the lifecycle of pods, init containers operate and conclude their tasks during the pending phase.
- Despite sharing the same container specification, init containers do not extend support for the lifecycle, readinessProbe, startupProbe, and livenessProbe fields. An exception exists for the native sidecar alpha feature.
9 Common Init Container Use Cases
Here are some possible scenarios where init containers proved to be a great addition.
- Cache Warm-Up: Init containers can efficiently warm up a cache. Preloading frequently used data into a Redis cache for improved performance is a practical example in this scenario.
- Database Schema Creation: Init containers can be employed to initiate the creation of a database schema, streamlining the setup process.
- Service Waiting: Init containers showcase the ability to patiently wait for a designated service to initiate before allowing the main application container to initiate.
- Network Configuration: Init containers excel at handling tasks like establishing network configurations or initiating connections to external services.
- Loading and Configuring Dependencies: Init containers adeptly manage the loading and configuration of dependencies. It is essential for the seamless startup of the primary application container.
- Security Checks: Init containers play a crucial role in executing security checks. These inspections range from vulnerability scanning to TLS certificate verification. It ensures a secure environment before the primary application container launches.
- Git Clone: The Init container is a great tool for tasks like cloning Git repositories or writing files into attached pod volumes.
- Environment Setup: Init containers proficiently handle tasks like applying permissions, creating directories, or executing custom scripts to configure the environment for the primary applications.
- Access to Secrets: Init containers possess exclusive access to Kubernetes secrets that may be inaccessible to application containers, making them ideal for retrieving secrets from secure vaults.
Practical Applications of Init Containers
Init containers are like helpers for a Pod in Kubernetes. Imagine you have a Pod running a website using Nginx, and you want to display the Pod's IP address on the website.
- First, there's a helper called "write-ip" that figures out the Pod's IP and saves it in a file called ip.txt in a special folder called /web-content.
- Then, another helper named "create-html" reads the IP from ip.txt and puts it into a file called index.html in the /web-content folder.
- After that, the main Nginx part (web-container) uses this special folder (/web-content) to show the IP on the website.
This way of doing things not only shows how these helper containers can be used one after the other but also how they help set up specific things in a container world.
Here's the whole setup in a format that you can use in Kubernetes. Save it as init-container.yaml.
<pre class="codeWrap"><code>apiVersion: v1
kind: Pod
metadata:
name: web-server-pod
spec:
initContainers:
- name: write-ip
image: busybox
command: ["sh", "-c", "echo $MY_POD_IP > /web-content/ip.txt; echo 'Wrote the Pod IP to ip.txt'"]
env:
- name: MY_POD_IP
valueFrom:
fieldRef:
fieldPath: status.podIP
volumeMounts:
- name: web-content
mountPath: /web-content
- name: create-html
image: busybox
command: ["sh", "-c", "echo 'Hello, World! Your Pod IP is: ' > /web-content/index.html; cat /web-content/ip.txt >> /web-content/index.html; echo 'Created index.html with the Pod IP'"]
volumeMounts:
- name: web-content
mountPath: /web-content
containers:
- name: web-container
image: nginx
volumeMounts:
- name: web-content
mountPath: /usr/share/nginx/html
volumes:
- name: web-content
emptyDir: {}
</code></pre>
Then, deploy this pod.
<pre class="codeWrap"><code>kubectl apply -f init-</code></pre>
Now if you get the pod status, you will see 1/1 container running.
<pre class="codeWrap"><code>$ kubectl get pods
NAME READY STATUS RESTARTS AGE
web-server-pod 1/1 Running 0 22s
</code></pre>
In the pod, there are three containers, but only one is doing something right now. That's because init containers, as we talked about earlier, do their jobs and then finish.
In this case, the two init containers made the special webpage for nginx, but they finished with a message saying they were done (non-zero exit codes). After they're done, the main Nginx container starts and shows the cool webpage.
Even though the init containers are done, we can still check what they did by looking at their logs. We added a simple command to say something in the logs. Checking the logs shows that both init containers did their job, and we can see what they said in the logs.
This shows that even if the init containers are finished and not doing anything now, we can still look at their logs to see what happened and understand what went on in the container world.
<pre class="codeWrap"><code>$ kubectl logs web-server-pod -c write-ip
Wrote the Pod IP to ip.txt
$ kubectl logs web-server-pod -c create-html
Created index.html with the Pod IP
</code></pre>
Now, let's check if the Nginx pod is using the special webpage by connecting to it using port forwarding.
<pre class="codeWrap"><code>kubectl port-forward pod/web-server-pod 8080:80</code></pre>
To view the Nginx application, attempt accessing it through localhost:8080 from your workstation. The Nginx index page will be presented, featuring a message that prominently showcases the Pod IP address. Refer to the accompanying image for a visual representation of this accessible display.
Setup CPU/Memory Resources
For init containers to do their jobs well, they need a certain amount of computer power (CPU) and memory. How much they get depends on how important their tasks are.
If you have a bunch of init containers, they all need resources. The rule is, they get as much as the one with the highest needs. So, if one init container doesn't say how much CPU or memory it wants, it gets the most allowed based on what the others need.
To set up how much CPU and memory init containers get, you use Kubernetes settings. This helps make sure each init container gets the right amount of resources it needs in the Kubernetes world.
<pre class="codeWrap"><code>spec: initContainers:
- name: init-container
image: init-container-image
resources:
requests:
cpu: 50m
memory: 64Mi
limits:
cpu: 100m
memory: 128Mi
</code></pre>
It's recommended to monitor and adapt resource limits in response to the real-world utilization patterns exhibited by Init Containers. This proactive approach aids in optimizing the allocation of resources within the cluster.
Nevertheless, it is imperative to uphold a balance, ensuring that the cumulative resources requested by both Init Containers and primary containers do not surpass the available resources within the cluster. It is necessary to maintain the overall efficiency and stability of the cluster environment.
Setup Volumes
Volumes play a pivotal role in the universe of Init Containers. It facilitates essential functions such as initialization, data setup, and preparatory tasks preceding the activation of primary application containers. The incorporation of volumes into Init Containers follows a familiar process.
Consider a scenario where an application requires access to a dataset or files that aren't feasible to include within the container image due to size constraints. In such instances, the strategic utilization of an Init Container becomes apparent. It can be tasked with the responsibility of fetching and loading these datasets into a shared volume.
Subsequently, this shared volume becomes a valuable resource accessible to the main container, fostering seamless collaboration between Init Containers and primary application containers. For a practical illustration, you can refer to the accompanying example YAML file.
<pre class="codeWrap"><code>apiVersion: v1
kind: Pod
metadata:
name: volume-example-pod
spec:
initContainers:
- name: download-dataset
image: busybox
command: ["wget", "-O", "/data/dataset.zip",
"https://example.com/dataset.zip"]
volumeMounts:
- name: data-volume
mountPath: /data
- name: unzip-dataset
image: busybox
command: ["unzip", "/data/dataset.zip", "-d", "/data"]
volumeMounts:
- name: data-volume
mountPath: /data
containers:
- name: main-app
image: main-app-image
volumeMounts:
- name: data-volume
mountPath: /app-data volumes:
- name: data-volume
emptyDir: {}
</code></pre>
Init Containers – Native Sidecar Use Case
Kubernetes version 1.28 has brought in a cool feature – now you can have sidekick containers, known as sidecars, using init containers. This comes with a new setting called restartPolicy, which, when set to "Always," brings in this alpha feature.
The big deal here is the idea of a "persistent init container." It kicks off things with an init container and uses restartPolicy to keep the sidecar container doing its thing for the entire life of the Pod. To turn an init container into a sidecar, just add "restartPolicy: Always" to its settings. If you don't add this, the container acts like a regular init container.
But wait, there's a catch. The restartPolicy trick only works if the SidecarContainers feature gate is turned on in the cluster. Right now, this feature gate is in alpha mode. If you're excited to try this out, there's a handy guide on turning on feature gates in Kubeadm with the latest Kubernetes version.
Now, let's get practical. Imagine you have an Nginx web server pod with the main nginx container keeping logs in a /var/log/nginx folder. We want to add a sidekick container, a fluentd logging agent, that's good at grabbing and dealing with all those nginx logs from /var/log/nginx.
In this setup, we use a shared spot called nginx-logs for both the logging-agent sidecar and the main nginx container. To make the logging agent a sidecar, it's crucial to add restartPolicy: Always in its settings. This little addition transforms the init container into a sidecar, making it work seamlessly with the main nginx container. And there you have it – a working example of native sidecar magic.
<pre class="codeWrap"><code>apiVersion: v1
kind: Pod
metadata:
name: webserver-pod
spec:
initContainers:
- name: logging-agent
image: fluentd:latest
restartPolicy: Always
volumeMounts:
- name: nginx-logs
mountPath: /var/log/nginx
containers:
- name: nginx
image: nginx:1.14.2
ports:
- containerPort: 80
volumeMounts:
- name: nginx-logs
mountPath: /var/log/nginx volumes:
- name: nginx-logs
emptyDir: {}
</code></pre>
To test it, save it as sidecar.yaml and deploy it using kubectl.
<pre class="codeWrap"><code>kubectl apply -f sidecar.yaml</code></pre>
Upon reviewing the pod status, you'll observe a commendable 2/2 containers marked in the running state. Notably, this comprises the operational native sidecar init container, seamlessly complementing its role. On the other hand, the primary Nginx container serves as the central component driving the pod's functionality. This succinct status update confirms the successful integration and concurrent execution of these two distinctive containers within the Kubernetes pod framework, reinforcing the effectiveness of their collaborative deployment.
The following unique characteristics of native sidecar init containers set them apart:
- Dedicated Lifecycle: Native sidecar containers operate autonomously, boasting a dedicated lifecycle independent of the primary containers within the Pod. This autonomy contrasts with non-native sidecars, ensuring that the termination of the Pod is unimpeded.
- Lifecycle Handlers and Probes: The inclusion of PostStart and PreStop lifecycle handlers, coupled with probes such as startup, readiness, and liveness, empowers native sidecar containers. These elements play a pivotal role in guaranteeing sidecar readiness and overall pod readiness, enhancing the robustness of the containerized environment.
- Non-Blocking Termination: Unlike their non-native counterparts, native sidecar containers don't obstruct the termination process of the Pod. This non-blocking nature contributes to the fluidity and efficiency of Pod lifecycle management.
Complete YAML Configuration for an Init Container
Now, let’s dive into the details of an Init Container using a handy kubectl command. This command will give you a lot of useful information about the various things you can set up in an Init Container object YAML file. It's a practical way to understand all the different options you have when creating an Init Container.
<pre class="codeWrap"><code>kubectl explain pod.spec.initContainers</code></pre>
The comprehensive Init Container YAML is illustrated below.
<pre class="codeWrap"><code>
spec:
initContainers:
- name: init-container
image: busybox:latest
command:
- "sh"
- "-c"
- "echo Initializing... && sleep 5"
imagePullPolicy: IfNotPresent
env:
- name: INIT_ENV_VAR
value: "init-value"
resources:
limits:
memory: "128Mi"
cpu: "500m"
requests:
memory: "64Mi"
cpu: "250m"
volumeMounts:
- name: init-container-volume
mountPath: /init-data
ports:
- containerPort: 80
securityContext:
runAsUser: 1000
runAsGroup: 1000
capabilities:
add: ["NET_ADMIN"]
readinessProbe:
httpGet:
path: /
port: 80
initialDelaySeconds: 5
periodSeconds: 10
livenessProbe:
httpGet:
path: /
port: 80
initialDelaySeconds: 15
periodSeconds: 20
startupProbe:
httpGet:
path: /
port: 80
initialDelaySeconds: 5
periodSeconds: 5
lifecycle:
postStart:
exec:
command: ["/bin/sh", "-c", "echo 'PostStart'"]
preStop:
exec:
command: ["/bin/sh", "-c", "echo 'PreStop'"]
restartPolicy: Always
volumes:
- name: init-container-volume
emptyDir: {}
</code></pre>
Remember that additional parameters resizePolicy, volumeDevices, and workingDir are noteworthy considerations when learning about the complexities of init container volumes.
Kubernetes Init Container – Best Practices
Here are some essential guidelines to uphold when working with init containers:
- Anticipate the possibility of init containers encountering failures. Accordingly, implement robust strategies such as well-thought-out back-off mechanisms, retries, and the incorporation of clear error messages to diagnose and resolve issues.
- Ensure that init containers are meticulously crafted to swiftly execute specific tasks without excessively utilizing resources.
- For scenarios involving multiple initialization tasks, opt for the utilization of distinct init containers for each task. This approach streamlines management and facilitates individual troubleshooting.
- Ensure that adequate resources are allocated to init containers. A shortfall in resources can lead to the failure or delay of initialization tasks, emphasizing the significance of appropriate resource provisioning.
- Safeguard sensitive information employed during initialization to prevent inadvertent disclosure and uphold security protocols.
- Leverage the capabilities of Kubernetes by making use of pre-run and post-run hooks. These hooks provide opportune moments to execute custom scripts or commands at specific phases of a container's lifecycle.
5 Key Differences between Sidecar Container & Kubernetes Init Container
We’ve listed five key differences between the sidecar and init containers.
- Init Container executes sequentially and completes before the main container starts. On the other hand, the Sidecar Container starts, runs, and terminates alongside the main container.
- Init Container performs tasks that need to be completed before the main container can start while the Sidecar Container provides supplementary functionality to the main container.
- Init Containers can be used to set up the environment for the main application such as downloading configuration files or initializing shared volumes. Sidecar Containers can be used for tasks such as logging data to external systems, collecting metrics, or handling security-related functions.
- Init Container doesn’t share the same network and storage resources as the main container while Sidecar Container shares the same.
- The Init Container ensures that the main container starts with the necessary prerequisites while the Sidecar Container directly affects the behavior and functionality of the main container.
FAQs
Here are some frequently asked questions we receive from our clients:
Q. How do Init Containers differ from Regular Containers?
A. The primary contrast lies in their purpose and lifecycle. Init Containers specialize in initialization tasks and ensuring readiness, while Regular Containers manage the core application logic and functionality.
Q. Can a pod have multiple init containers?
A. Absolutely, a pod can house multiple init containers. They execute sequentially, with each init container concluding its tasks before the subsequent one commences.
Q. How do Init Containers differ from Sidecar Containers?
A. Init Containers concentrate on initialization tasks, preparing the environment for the main container. In contrast, Sidecar Containers augment the functionality of the main container by providing additional features and services throughout its lifecycle.


Facing Challenges in Cloud, DevOps, or Security?
Let’s tackle them together!
get free consultation sessions
We will contact you shortly.
