

Navigating Kubernetes Services Load Balancers
In this article, we will discuss how we can use service load balancing in the Kubernetes cluster and it helps in achieving high availability.
The way applications are hosted has changed over the years due to scalable and powerful Kubernetes architecture. Application downtime can be significantly decreased using Kubernetes. Whether it’s unplanned hardware related downtime or deployment of a software release, Kubernetes serves as a favorable option.
Kubernetes Service: Introduction
To learn about the Kubernetes services it’s important to understand the concepts of pods. Pods are temporary locations in Kubernetes where applications live. A pod is assigned a new IP address every time it’s launched. With every new deployment new pods are destroyed and recreated dynamically. To track the IP addresses of all the active pods Kubernetes services are used. Without Kubernetes services, it would have been a difficult task and it would increase the risk of application downtime.
Kubernetes service maps one or more pods by creating an abstraction. It allows applications to connect to the service using the service name. This removes the condition for other applications to know the IP addresses assigned to the pods. Similarly, the end-users and external applications can also access the service as they are exposed to the public through the Internet.
As an example of the service definition let’s expose the pods with the label app=redis to a service redis-service using TCP port 6397
<pre class="codeWrap"><code>apiVersion: v1
kind: Service
metadata:
name: redis-service
spec:
selector:
app: redis
ports:
- protocol: TCP
name: redis
port: 6379
targetPort: 6379
</code></pre>
The selector is responsible for mapping the service correctly to the corresponding pods. Here when a service gets a matching pod, it updates the IP address of the pod to the Endpoint. Endpoint is a Kubernetes object that keeps the record of the IP address of all the matching pods and updates its list automatically. Endpoint objects are created by each service.
In our example of Redis we can observe a line called Endpoints which refers to the list of pods’ IP addresses.
<pre class="codeWrap"><code>> kubectl describe service redis-service</code></pre>
Name: redis-service
Namespace: prod
Labels: <none>
Annotations: Selector: app=redis
Selector: app=redis
Type: ClusterIP
IP: 10.0.215.46
Port: redis 6379/TCP
TargetPort: 6379/TCP
Endpoints: 10.244.0.234:6379,10.244.1.74:6379
Session Affinity: None
Events: <none>
The endpoint objects are going to have the same name as that of the service.
<pre class="codeWrap"><code>> kubectl describe endpoints redis-service</code></pre>
Name: redis-service
Namespace: prod
Labels: app=redis
Annotations: endpoints.kubernetes.io/last-change-trigger-time: 2021-07-07T13:22:09Z
Subsets:
Addresses: 10.244.0.234,10.244.1.74
NotReadyAddresses: <none>
Ports:
Name Port Protocol
---- ---- --------
redis 6379 TCP
Events: <none>
It is a common way of defining a service and keeps in mind that Endpoints maintains a list of up-to-date IP addresses and this list is used by the service.
We can also define a service without the selector. For example, if we migrate our application to Kubernetes, we can evaluate how it behaves without migrating the Redis server. We want to use the existing Redis server, which is still in the old server. In such a scenario, we create a service as shown below:
Service can also be defined without using a selector. Let’s take an example of the scenario where we have migrated a new application to Kubernetes. We don’t want to observe how the application behaves without migrating to the Redis server. To use the existing Redis server which is in the old server service can be used.
Create a service using the following code:
<pre class="codeWrap"><code>apiVersion: v1</code></pre>
kind: Service
metadata:
name: redis-service-without-ep
spec:
ports:
- protocol: TCP
port: 6379
targetPort: 6379
Now create an endpoint object with the same name and point it to the Redis server IP address:
<pre class="codeWrap"><code>piVersion: v1</code></pre>
kind: Endpoints
metadata:
name: redis-service-without-ep
subsets:
- addresses:
- ip: 172.0.0.103
ports:
- port: 6379
Now use the service name redis-service-without-ep in the application to connect to the resdis server.
Types of Kubernetes Services
By default, Kubernetes creates a ClusterIP type of service. We can build different kinds of services by having a spec.type property in the service YAML file. Kubernetes by default creates a ClusterIP service. The spec.type property in the YAML file allows building different kinds of services. There are four types of Kubernetes service:
ClusterIP
This service is accessible within the cluster and the dependent applications can interact with each other using this service
<pre class="codeWrap"><code>apiVersion: v1</code></pre>
kind: Service
metadata:
name: redis-service
spec:
type: ClusterIP #optional for ClusterIP
selector:
app: redis
ports:
- protocol: TCP
port: 6379
targetPort: 6379
NodePort
These services are accessible outside the cluster. The nodeport service creates a mapping of pods on a static port on its hosting node. For example, there’s a node having a Redis pod running under it. The IP address of that node is 10.0.0.20 so the nodeport will expose the 10.0.0.20:30038 which is accessible outside the Kubernetes cluster. Here we are assuming that port 30038 is exposed.
<pre class="codeWrap"><code>apiVersion: v1</code></pre>
kind: Service
metadata:
name: redis-service
spec:
type: NodePort
selector:
app: redis
ports:
- protocol: TCP
port: 6379
targetPort: 6379
nodePort: 30038
LoadBalancer
LoadBalancer service as the name suggests creates a load balancer in cloud platforms like GCP,AWS,Azure to expose the application to the internet. After that, the cloud provider will be responsible for routing the traffic to the service. A common use case of this service is web-based apps or websites.
<pre class="codeWrap"><code>apiVersion: v1</code></pre>
kind: Service
metadata:
name: redis-service
spec:
type: LoadBalancer
selector:
app: redis
ports:
- protocol: TCP
port: 6379
targetPort: 6379
ExternalName
This service is used to access any application that is outside the Kubernetes cluster such as an external database. The service will use CNAME to redirect to the external server instead of using an endpoint.
<pre class="codeWrap"><code>apiVersion: v1</code></pre>
kind: Service
metadata:
name: redis-service
spec:
type: ExternalName
externalName: my.redis-service.example.com
DNS
A DNS name will be provided to each service and it can be used by the other microservices.
The format of DNS looks like this: service-name.namespace.svc.cluster.local
- Example: redis-service.default.svc.cluster.local
This DNS record will be resolved to the cluster IP address of a standard service. This way, a headless service will be used to point to the individual IP addresses of the pods.
In some scenarios an SRV record is also created:
- _port-name._protocol.service.namespace.svc.cluster.local
Accessing the Kubernetes Services
Now that we have established an understanding of Kubernetes services, let's understand how these services are accessed and used by other microservices. On the basis of accessibility, Kubernetes services are divided into two categories: Internal accessibility and external accessibility.
Internal Service Load balancing
ClusterIP service can be used for internal accessibility. Let’s say pod of service-A wants to talk to the pod of service-B and both are in the same Kubernetes cluster. We can use either DNS or environmental variables to access. As we have discussed earlier, DNS records will be created by each service. The DNS option can only be applied if the Kubernetes cluster has a DNS server addon like CoreDNS.
However, the microservice can be from the same or different namespace. DNS is the most recommended option for applications to interact. The other option is environmental variables set by Kubernetes in new pods at the time of their creation. These variables can be used by applications in their runtime. A few common service-related variables include:
- service-name_SERVICE_HOST
- service-name_PORT
- service-name_PORT
External Service Load balancing
The available options for external access are:
- NodePort
- LoadBalancer
External Load balancing using NodePort
The NodePort service type can be used when we have a finite number of services. It provides connectivity to the application without relying on the dedicated external load balancer. To use NodePort the nodes must be accessible using their IP addresses. The nodes are mostly in a private network so in these cases Noport service can’t be accessed from the internet.
The downside of using NodePort service is that it uses a static port to map the Node’s IP addresses. This conditions the service to allocate the same port on each node when provisioned and the allocatable port range is between 30000 to 32767. This causes issues when multiple microservices are used and applications scale up.
External Load balancing using LoadBalancer
The public cloud providers when creating a service use the property spec.type: LoadBalancer and create the load balancers automatically. Loadbalancers don’t have a direct mapping to the Pods and it uses a Public IP address or DNS to connect external users. Client requests are directed through LoadBalancer to the service port, and then to healthy pods.
External Load Balancing UseCase
In this example, we will create and use the external LB with LoadBalancer service type. For this, we will connect the Admin GUI of RabbitMQ Pod from the internet. The LoadBalancer serves as a proxy and forwards the client requests to respective services. It doesn’t do any filtering of incoming and outgoing requests.
We are using AWS EKS to provide the Load Balancers. You can use any other cloud platform that provides Load Balancer. You can refer to the following commands to set up the EKS cluster:
<pre class="codeWrap"><code>aws ec2 create-key-pair --region us-west-2 --key-name myKeyPair</code></pre>
eksctl create cluster
--name myEKSCluster
--region ap-south-1
--with-oidc
--ssh-access
--ssh-public-key <myKeyPair-public-key-path>
--managed
After setting up the Kubernetes cluster, use the following commands to launch the RMQ pod.
<pre class="codeWrap"><code>apiVersion: v1</code></pre>
kind: Pod
metadata:
name: rabbitmq
labels:
app: rabbitmq
spec:
containers:
- name: rabbitmq
image: rabbitmq:latest
Now create the pod.
<pre class="codeWrap"><code>kubectl apply -f rmq-pod.yaml</code></pre>
Check if the pod is up and running:
<pre class="codeWrap"><code>> kubectl get pods --selector='app=rabbitmq'</code></pre>
NAME READY STATUS RESTARTS AGE
rabbitmq 1/1 Running 0 91m
Now create the Service manifest, rmq-svc.yaml:
<pre class="codeWrap">apiVersion: v1<code></code></pre>
kind: Service
metadata:
name: rmq-external-service
spec:
type: LoadBalancer
selector:
app: rabbitmq
ports:
- name: rmq-admin
protocol: TCP
port: 15672
targetPort: 15672
Create and verify service:
<pre class="codeWrap"><code>> kubectl apply -f rmq-svc.yaml</code></pre>
service/rmq-external-service created
<pre class="codeWrap"><code>> kubectl get svc</code></pre>
NAME TYPE CLUSTER-IP EXTERNAL-IP PORT(S) AGE
rmq-external-service LoadBalancer 10.100.37.235 a8e294d5ad3d74562ac0ca47e8eaec9a-34496842.ap-south-1.elb.amazonaws.com 15672:31716/TCP 4m45s
Notice that there’s an LB DNS name under EXTERNAL-IP. This refers to the external load balancer in AWS:
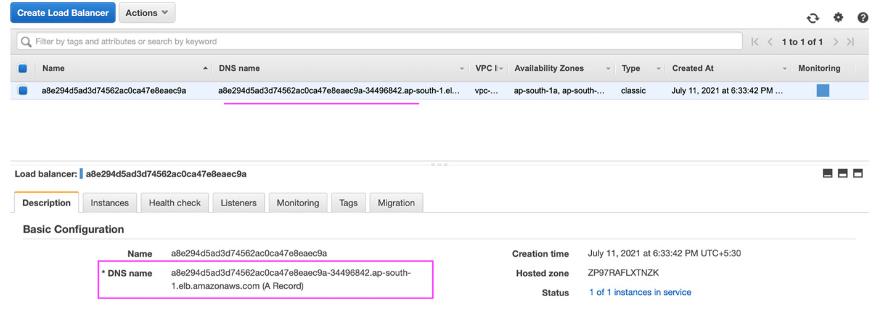
This DNS name can be shared with users and it allows them to access the RMQ admin. It’s really easy to create and configure an external Load Balancer and expose the applications. There are a few challenges in Load Balancer which we will discuss ahead.
What is Ingress?
So far we have established an understanding of how LoadBalancer service type can create an application load balancer for each service. This approach becomes problematic when we have multiple services to expose. It’s no longer a cost-effective and easy-to-manage solution. In addition to this, the LoadBalancer type has no support for SSL termination, URL routing, etc.
Ingress can be considered an extension of LoadBalancer. It acts as a bridge between external requests and Kubernetes clusters. It processes the requests and figures out which services it should be forwarded. The key features of Ingress include name-based virtual hosting, URL routing, SSL termination, and load balancing.
An Ingress object can be defined as:
<pre class="codeWrap"><code>kind: Ingress</code></pre>
apiVersion: extensions/v1beta1
metadata:
name: "example-ingress"
namespace: production
annotations:
kubernetes.io/ingress.class: alb
alb.ingress.kubernetes.io/scheme: internet-facing
alb.ingress.kubernetes.io/listen-ports: '[{"HTTPS":443}, {"HTTP":80}]'
spec:
rules:
- host: abc.com
http:
paths:
- path: /orders
backend:
serviceName: order-service
servicePort: 8080
- path: /blog
backend:
serviceName: blog-service
servicePort: 8081
In the above example, the spec section defines the rules to determine how requests from users would flow. The Ingress controller forwards the requests to https://abc.com/oders to an internal service named the order service on port 8080
It’s important to note that Ingress is a collection of rules that uses the LoadBalancer or NodePort service type and it’s not a Kubernetes service type. To use Ingress, the Kubernetes cluster needs an Ingress controller.
The most common Ingress controllers include:
- AWS Load Balancer Controller
- Nginx Ingress Controller
- Istio Ingress
- Traefik Kubernetes Ingress provider
All these controllers have different features and should be selected based on the project requirements. Regardless of the controller, it’s quite easy to configure and manage the routing rules and deal with SSL-based requests, etc.
Ingress Controllers for Load Balancing
Ingress controllers support various algorithms for their load balancing and the most commonly used are Round Robin and Least connection. For instance, the ingress controller for AWS ALB supports round_robin and least_outstanding_requests. Similarly, the Nginx ingress controller supports round_robin, least_outstanding_requests, Least Time Load Balancing, and IP Hashing.
The choice of ingress controller depends on the workload. You can use default options in case you don’t know which is better suited to your use case.
Best Practices for using Kubernetes Services
Let’s look at some of the best practices to effectively use kubernetes services:
- To connect the services within a cluster use DNS
- When exposing externally, use Ingress
- Always expose standard ports to external traffic like 80 or 443.
- Enable SSL in the external load balancer
- To manage access restrictions use Network policies
Conclusion
Kubernetes services simplify the way microservices interact and manage resources. We have developed an understanding of how services work, their types, how to use load balancers, and why we need Ingress. The way we utilize the Kubernetes services in our solution depends on the specific use case. If you design your Kubernetes services architecture based on the use case it’s going to save time and resources and help to scale the application.


Facing Challenges in Cloud, DevOps, or Security?
Let’s tackle them together!
get free consultation sessions
We will contact you shortly.
