

Kubernetes Taints & Tolerations
In this article, we will explain the concept of taints and tolerations using a hands-on example.
Taints and Tolerations are a Kubernetes feature that allows the application container to be in a separate node group. In practice, we use Kubernetes clusters in multi-tenant and heterogeneous environments. This gives rise to scenarios in which the pods require specific hardware or depend on other pods. To address such issues, taints, and tolerations are used.
Overview of Taints and Tolerations
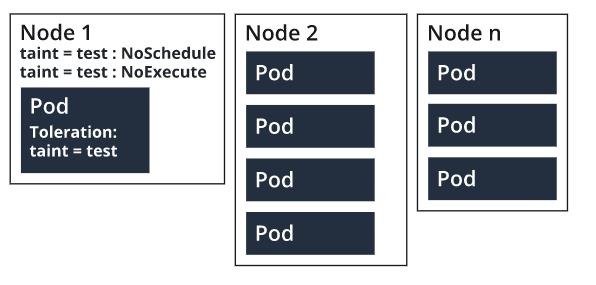
Taints are applied to nodes, and tolerance is added to the pod specification. Together, taints and tolerances ensure that pods are placed in the correct nodes. A node that’s tainted is going to repel all nodes except the ones that have a tolerance for that taint. There can be more than one taint associated with a node.
A taint can have an effect in the following ways:
- NoSchedule: Only those pods scheduled by the Kubernetes scheduler can tolerate tainted nodes.
- PreferNoSchedule: Avoid scheduling pods that have no tolerance for the tainted node.
- NoExecute: Terminate running pods from the node that has no tolerance for the tainted nodes.
Use Cases for Taints and Tolerations
One of the common use cases for taints and toleration is dedicated nodes. In scenarios where you want to specify dedicated worker nodes for a few users, you can add a taint to those nodes.
Use the following Kubectl command to specify the dedicated node:
<pre class="codeWrap"><code>kubectl taint nodes nodename dedicated=groupName:NoSchedule </code></pre>
After that, add tolerance to that user group's pod to run on those nodes. You can also add labels to those nodes to ensure that pods run on those nodes only, for example, dedicated=groupName. NodeSelector can be used to specify deployment specs to ensure that user group pods and node groups are bound to each other.
Taint and tolerance are quite useful when we have specific hardware requirements. In these situations, we don’t want normal pods to run on nodes with special hardware requirements. Use the following command to add taint to those nodes:
<pre class="codeWrap"><code>kubectl taint nodes nodename special=true:NoSchedule </code></pre>
Now you can add toleration to the pods that require special hardware requirements to run on tainted pods.
In cases where nodes become unreachable from the controller, the pods also face lag. In order to avoid such a situation, the NoExecute effect in taint is used to evict all running pods from nodes. In this case, the pods have no tolerance for the taint, and these pods can be rescheduled for other working nodes. The node controller in such situations takes automatic actions.
The built-in taints include:
- node.kubernetes.io/not-ready: The NodeConditionReady attribute is false, hence the node is not ready.
- node.kubernetes.io/unreachable: The NodeConditionReady attribute is unknown. This implies that the node is not reachable from the node controller.
- node.kubernetes.io/memory-pressure: This shows that the node has memory pressure.
- node.kubernetes.io/disk-pressure: This shows high disk pressure, and it’s better to relocate pods in order to avoid the slowness of the application.
- node.kubernetes.io/pid-pressure: shows that the node has high Process ID pressure, and its saturation can cause the applications to slow down. To avoid this, pods need to be relocated to other nodes.
- node.kubernetes.io/network-unavailable: Tells that node’s network is unavailable.
- node.kubernetes.io/unschedulable: This shows that the node is unschedulable and is not available to host pods.
Taints and Tolerations- Hands-on Example
Let’s assume that we have a Kubernetes cluster that has two groups of worker nodes, i.e., front-end and back-end. We want to deploy the front-end pods to front-end worker nodes and the back-end pods to back-end worker nodes. The master node runs the control plane components only, and no new pods can be scheduled there. First, let’s just look at the default Kubernetes configurations to see which nodes are already tainted.
In the default configurations, master nodes are already tainted. This means that no user pods can run on master nodes unless new pods are added with tolerance for those taints. Notice that there’s a worker node with no taints. Let’s add a taint to a worker node and bind it with front-end pods. Use the kubectl taint command for this.
<pre class="codeWrap"><code> kubectl taint nodes cluster01-worker-1 app=frontend:NoSchedule node/cluster01-worker-1 tainted</code></pre>
As per the above settings, the worker node has a key app, and the value for that key is frontend. The effect added to this node is NoSchedule, so only pods with tolerance for that taint are added. Now deploy an app on the cluster first without any toleration configured in the deployment configurations.
<pre class="codeWrap"><code>kubectl create ns frontend
namespace/frontend created
kubectl run nginx --image=nginx --namespace frontend
deployment.apps/nginx created
kubectl get pods -n frontend
NAME READY STATUS RESTARTS AGE
nginx-76df748b9-gjbs4 0/1 Pending 0 9s
kubectl get events -n frontend
LAST SEEN TYPE REASON OBJECT MESSAGE
<unknown> Warning FailedScheduling pod/nginx-76df748b9-gjbs4 0/4 nodes are available: 1 node(s) had taint {app: frontend}, that the pod didn't tolerate, 3 node(s) had taint {node-role.kubernetes.io/controlplane: true}, that the pod didn't tolerate.
<unknown> Warning FailedScheduling pod/nginx-76df748b9-gjbs4 0/4 nodes are available: 1 node(s) had taint {app: frontend}, that the pod didn't tolerate, 3 node(s) had taint {node-role.kubernetes.io/controlplane: true}, that the pod didn't tolerate.
</code></pre>
Using the kubectl run command, we created a namespace and deployed Nginx. However, the pod status and cluster events show that pods can’t be scheduled as no worker nodes are present. To place the pod, we need to add the tolerance of the taint we have configured above. The current YAML file looks like this:
<pre class="codeWrap"><code>kubectl get deployment nginx -n frontend -o yaml
apiVersion: apps/v1
kind: Deployment
metadata:
annotations:
deployment.kubernetes.io/revision: "1"
creationTimestamp: "2021-08-29T09:39:37Z"
generation: 1
labels:
run: nginx
name: nginx
namespace: frontend
resourceVersion: "13367313"
selfLink: /apis/apps/v1/namespaces/frontend/deployments/nginx
uid: e46e026e-3a92-4aac-b985-7110426aa437
spec:
progressDeadlineSeconds: 600
replicas: 1
revisionHistoryLimit: 10
selector:
matchLabels:
run: nginx
strategy:
rollingUpdate:
maxSurge: 25%
maxUnavailable: 25%
type: RollingUpdate
template:
metadata:
creationTimestamp: null
labels:
run: nginx
spec:
containers:
- image: nginx
imagePullPolicy: Always
name: nginx
resources: {}
terminationMessagePath: /dev/termination-log
terminationMessagePolicy: File
dnsPolicy: ClusterFirst
restartPolicy: Always
schedulerName: default-scheduler
securityContext: {}
terminationGracePeriodSeconds: 30
</code></pre>
There’s no tolerance in the pod specs so far. Let’s add tolerance to the pod specs.
<pre class="codeWrap"><code>kubectl edit deployment nginx -n frontend
deployment.apps/nginx edited
kubectl edit deployment nginx -n frontend
deployment.apps/nginx edited
kubectl get deployment nginx -n frontend -o yaml
apiVersion: apps/v1
kind: Deployment
metadata:
annotations:
deployment.kubernetes.io/revision: "3"
creationTimestamp: "2021-08-29T09:39:37Z"
generation: 3
labels:
run: nginx
name: nginx
namespace: frontend
resourceVersion: "13368509"
selfLink: /apis/apps/v1/namespaces/frontend/deployments/nginx
uid: e46e026e-3a92-4aac-b985-7110426aa437
spec:
progressDeadlineSeconds: 600
replicas: 1
revisionHistoryLimit: 10
selector:
matchLabels:
run: nginx
strategy:
rollingUpdate:
maxSurge: 25%
maxUnavailable: 25%
type: RollingUpdate
template:
metadata:
creationTimestamp: null
labels:
run: nginx
spec:
containers:
- image: nginx
imagePullPolicy: Always
name: nginx
resources: {}
terminationMessagePath: /dev/termination-log
terminationMessagePolicy: File
dnsPolicy: ClusterFirst
restartPolicy: Always
schedulerName: default-scheduler
securityContext: {}
terminationGracePeriodSeconds: 30
tolerations:
- effect: NoSchedule
key: app
operator: Equal
value: frontend
</code></pre>
After adding the pod tolerance, let’s view the pod’s status.
<pre class="codeWrap"><code> kubectl get events -n frontend
LAST SEEN TYPE REASON OBJECT MESSAGE
3m56s Normal SuccessfulCreate replicaset/nginx-9cf9fd78f Created pod: nginx-9cf9fd78f-khc5z
2s Normal SuccessfulDelete replicaset/nginx-9cf9fd78f Deleted pod: nginx-9cf9fd78f-khc5z
7m7s Normal ScalingReplicaSet deployment/nginx Scaled up replica set nginx-76df748b9 to 1
3m56s Normal ScalingReplicaSet deployment/nginx Scaled up replica set nginx-9cf9fd78f to 1
10s Normal ScalingReplicaSet deployment/nginx Scaled down replica set nginx-76df748b9 to 0
10s Normal ScalingReplicaSet deployment/nginx Scaled up replica set nginx-8cb54bccc to 1
2s Normal ScalingReplicaSet deployment/nginx Scaled down replica set nginx-9cf9fd78f to 0
kubectl get pods -n frontend
NAME READY STATUS RESTARTS AGE
nginx-8cb54bccc-g4htt 1/1 Running 0 38s
</code></pre>
The frontend pod can run on the appropriate node. Here we have just one tainted node and two master nodes, but if there are more nodes that are not tainted, this pod can land on those nodes as well. To avoid this, we can add labels and NodeSelector to the PD deployment specification to make sure that pods are only scheduled on the front-end nodes.
Conclusion
Taints and tolerance are excellent ways to schedule pods and control the pods running on nodes. As compared to other methods like affinity, it’s a more manageable and easier way. When dealing with scenarios where nodes have special hardware requirements and taint-based pod evictions, taint, and tolerations provide a reliable solution.


Facing Challenges in Cloud, DevOps, or Security?
Let’s tackle them together!
get free consultation sessions
We will contact you shortly.
