

Shared GPU Resources: Efficient Access Part 2
Let’s continue our series on efficient access to shared resources and GPUs within Kubernetes. Make sure you’re up to date before reading part 2.
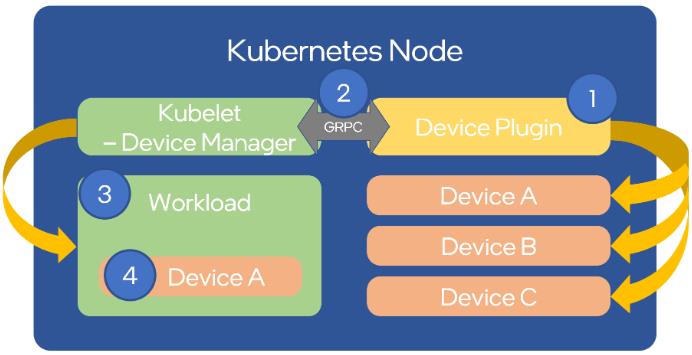
Kubernetes extends the capacity of a cluster by utilizing the device plugin framework. This framework gives specialized hardware the ability to spotlight itself to kubelet, maintaining Kubernetes' integrity without modification. Here is a high-level representation of the scenario:
Nonetheless, manually configuring the nodes and administering them can be a cumbersome task. A system administrator needs to juggle various elements like drivers, container runtimes, and an extensive collection of libraries. For this job to be easier, NVIDIA provides an automated pathway that manages NVIDIA's resources and corresponding software through the NVIDIA GPU operator. This incorporates the NVIDIA drivers, NVIDIA container runtime, Data Center GPU Manager (DCGM), which facilitates monitoring, among others.
Drivers Setup and Configuration
The GPU-operator equips you with a Helm chart that simplifies the basic installation and advanced configuration of time-slicing and MIG. This process will be done through hands-on practice, accompanying each step in the process.
To install the driver, the operator will attempt to pull an existing container with the following format - <driver>-<name>-<version_id>. It is important to note that this container must already exist in the remote registry. You can use the following command to ensure that a tag exists matching the specific driver version and distribution you are using:
<pre class="codeWrap"><code>$ skopeo list-tags -- docker://nvcr.io/nvidia/driver | grep 510.47.03
"510.47.03-centos7",
"510.47.03-rhcos4.10",
"510.47.03-rhcos4.9",
"510.47.03-ubuntu18.04",
"510.47.03-ubuntu20.04",
</code></pre>
For our application, we depend on FCOS. While it does not have an official image, there is an available fork found in this alternative repository. By filtering the labels by the kernel version, you can identify other NVIDIA driver version options.
Once we have our dependent container images, let's commence the installation of the GPU-operator chart on our cluster. First, we need to add and update the Helm chart repository:
<pre class="codeWrap"><code>$ helm repo add nvidia https://nvidia.github.io/gpu-operator</code></pre>
$ helm repo update nvidia
It is crucial to remember that the gpu-operator tags the driver image as -fedora<VERSION_ID>, meaning we must mirror the image in our registry:
<pre class="codeWrap"><code>$ skopeo copy docker://docker.io/fifofonix/driver:510.47.03-fedora35-5.16.13-200.fc35.x86_64 \ docker://yourregistry/yourproject/driver:510.47.03-fedora35-5.16.13-200.fc35.x86_64-fedora35 --dest-username <user> --dest-password <password>
</code></pre>
Next, we'll update the gpu-operator values.yaml configuration to align with our expected configuration options:
<pre class="codeWrap"><code>$ cat values.yaml
operator:
defaultRuntime: containerd
mig:
strategy: mixed
driver:
repository: yourregistry/yourproject
image: driver
version: "510.47.03-fedora35-5.16.13-200.fc35.x86_64"
imagePullPolicy: Always
migManager:
config:
name: nvidia-mig-config
devicePlugin:
config:
name: nvidia-time-slicing-config
</code></pre>
We then proceed with the installation using the following command:
<pre class="codeWrap"><code>$ helm upgrade -i gpu-operator nvidia/gpu-operator --version v22.9.1 --values values.yaml --namespace kube-system</code></pre>
It's important to note that both the driver version and CUDA version can be configured using the same values.yaml file provided above. Unless specified, the chart will operate on its own default settings. If you choose to manually set the versions, ensure to cross-verify the CUDA Application Compatibility Support Matrix to select compatible driver/CUDA versions.
For the final step in the installation process, we need to incorporate supplementary files into the cluster. While we will discuss this in more detail in upcoming chapters, for now, you need to download the nvidia-time-slicing-config and nvidia-mig-config manifests and introduce them to your cluster:
<pre class="codeWrap"><code>$ kubectl apply -f nvidia-time-slicing-config.yaml
$ kubectl apply -f nvidia-mig-config.yaml
</code></pre>
After completing these steps, all GPU-operator components should be successfully installed:
<pre class="codeWrap"><code>$ kubectl get po -n kube-system
NAME READY STATUS RESTARTS AGE
nvidia-container-toolkit-daemonset-cb7sj 1/1 Running 0 3d16h
nvidia-cuda-validator-hkpw7 0/1 Completed 0 3d16h
nvidia-dcgm-exporter-vxtx8 1/1 Running 0 3d16h
nvidia-device-plugin-daemonset-7cqvs 2/2 Running 0 2d18h
nvidia-device-plugin-validator-ndk54 0/1 Completed 0 3d16h
nvidia-driver-daemonset-plzrb 1/1 Running 0 3d16h
nvidia-hack-force-mig-config-46wrf 1/1 Running 0 3d16h [1]
nvidia-mig-manager-4szxx 1/1 Running 0 3d16h
nvidia-operator-validator-d66nb 1/1 Running 0 3d16h
</code></pre>
Time-slicing setup on Kubernetes
The GPU operator comes with a default configuration for slicing profiles. The following example demonstrates how to create custom profiles, enabling GPUs to be shared across 4 or 10 pods. This is accomplished by dividing the resource of type nvidia.com/gpu into 4 or 10 replicas, which can then be shared among 4 or 10 pods:
<pre class="codeWrap"><code>apiVersion: v1
kind: ConfigMap
metadata:
name: nvidia-time-slicing-config
namespace: kube-system
data:
slice-4: |-
version: v1
sharing:
timeSlicing:
renameByDefault: true
failRequestsGreaterThanOne: true
resources:
- name: nvidia.com/gpu
replicas: 4
slice-10: |-
version: v1
sharing:
timeSlicing:
renameByDefault: true
failRequestsGreaterThanOne: true
resources:
- name: nvidia.com/gpu
replicas: 10
</code></pre>
The configuration from previous sections has already incorporated the reference to this ConfigMap.
After updating the configuration, you can:
- Apply it to existing nodes using a specific label:
<pre class="codeWrap"><code>$ kubectl label node <NAME> nvidia.com/device-plugin.config=<PROFILE></code></pre>
- Set a default profile for every GPU node in your cluster by passing it in the Helm chart configuration:
<pre class="codeWrap"><code>devicePlugin:
config:
default: <PROFILE>
</code></pre>
Now, let's set a time-slice profile for one of our nodes. The reconciliation process should take around 1 to 2 minutes:
<pre class="codeWrap"><code>$ kubectl label node <NAME> nvidia.com/device-plugin.config=slice-4</code></pre>
To verify that time sharing is enabled post-labeling, use the kubectl describe node command. Look for the GPU number in the allocatable resources section - it should now be 4 times the physically available GPUs in the node. With our time-slicing setup, the new resource will have the .shared suffix. For example, on a node with 4 GPU cards:
<pre class="codeWrap"><code>Allocatable:
nvidia.com/gpu: 4
</code></pre>
Transforms into:
<pre class="codeWrap"><code>Allocatable:
nvidia.com/gpu.shared: 16
</code></pre>
To ensure the deployment functions as expected, use a test manifest:
<pre class="codeWrap"><code>apiVersion: apps/v1
kind: ReplicaSet
metadata:
name: nvidia-test-time-slice
labels:
app: nvidia-test
spec:
replicas: 5
selector:
matchLabels:
app: nvidia-test
template:
metadata:
labels:
app: nvidia-test
spec:
containers:
- name: nvidia
image: oguzpastirmaci/gpu-burn
args:
- "10000"
resources:
limits:
nvidia.com/gpu.shared: 1
</code></pre>
<pre class="codeWrap"><code>$ kubectl get po
NAMESPACE NAME READY STATUS RESTARTS AGE
default nvidia-test-time-slice-2jxt2 1/1 Running 0 22s
default nvidia-test-time-slice-gzxr5 1/1 Running 0 22s
default nvidia-test-time-slice-kpwcn 1/1 Running 0 22s
default nvidia-test-time-slice-vt265 1/1 Running 0 22s
default nvidia-test-time-slice-wvpx4 1/1 Running 0 22s
…
</code></pre>
Time-slicing capabilities can also be utilized alongside MIG. All you need to do is pass a MIG instance (e.g., nvidia.com/mig-1g.5gb) in place of the generic nvidia.com/gpu. The subsequent sections will delve into the MIG configuration process.
For additional information on GPU time slicing, consult the official Nvidia documentation.
Limiting Memory Usage
A significant constraint of Time Slicing is the absence of memory segregation among GPU processes running on the same card. This limitation can be minimized by certain frameworks like TensorFlow, but hinges on users adhering to pre-declared resources.
To prevent bad actors that could disturb other users' GPU processes by draining the card's memory (beyond the agreed maximum limit), a simple process is employed. This process periodically scrutinizes the allocated GPU process memory, terminating any aberrations. This mechanism is akin to Kubernetes' approach to supervising memory usage by pods.
By ensuring that each process running on the GPU abides by the agreed memory usage, we can offer a more dependable environment for developmental workloads like notebooks or other typically variable workloads. Simultaneously, it enhances the overall usage and efficiency of individual cards.
Multi-Instance GPU Setup on Kubernetes
When deploying MIG, there are several strategies to consider:
Single:
- MIG devices are categorized as nvidia.com/gpu.
- The resource nvidia.com/gpu now correlates to the available MIG devices on that particular node, instead of the full GPUs.
Mixed:
- Different resource types are categorized for every available MIG device. For instance, nvidia.com/mig-3g.20gb, nvidia.com/mig-1g.5gb, etc.
- The partitions can be requested by name. mig.strategy should be set to mixed when MIG mode is not activated on all GPUs on a node.
None:
- There is no difference between GPUs with or without MIG. The available devices are designated as nvidia.com/gpu resource type.
Similar to the time-slicing configuration file, the GPU-operator presents a default version for MIG profiles. Nevertheless, we will create our own to permit some customizations - in this case, we disregard things we consider unuseful (for example, 7g.5gb). A snippet of our final configmap is described below:
<pre class="codeWrap"><code>apiVersion: v1
kind: ConfigMap
metadata:
name: nvidia-mig-config
namespace: kube-system
data:
config.yaml: |
version: v1
mig-configs:
disabled:
- devices: all
mig-enabled: false
# A100-40GB
2x2g.10gb-3x1g.5gb:
- devices: all
mig-enabled: true
mig-devices:
"1g.5gb": 3
"2g.10gb": 2
</code></pre>
A comprehensive list of A100 GPU MIG profiles can be found in the documentation, but we expose only specific configurations that enhance compute performance. We will elaborate on this in a future blog post.
In the Drivers Setup and Configuration section, in values.yaml for the GPU-operator, the MIG strategy was previously set to mixed. The subsequent step is to select the profile for each node by means of a label:
<pre class="codeWrap"><code>$ kubectl label node <NAME> nvidia.com/mig.config=<PROFILE></code></pre>
For instance, if a node comprises 4 A100 GPUs, and is tagged with nvidia.com/mig.config=7x1g.5gb, all GPUs in this node will be partitioned into 7 MIG graphical instances.
Depending on the strategy chosen on the node, the allocatable.resources highlighted by that node will be:
- For single strategy: 4*7 = 28 nvidia.com/gpu
- For mixed strategy: 4*7 = 28 nvidia.com/mig-1g.5gb
For additional information, refer to the GPU operator and MIG user guide in the upstream documentation.
Here's an example of setting the 2x2g.10gb-3x1g.5gb MIG profile to one node:
<pre class="codeWrap"><code>$ kubectl label node <NAME> nvidia.com/mig.config=2x2g.10gb-3x1g.5gb</code></pre>
So, on a node with 4 GPU cards:
<pre class="codeWrap"><code>Allocatable:
nvidia.com/gpu: 4
</code></pre>
Transforms into:
<pre class="codeWrap"><code>Allocatable:
nvidia.com/mig-1g.5gb: 12
nvidia.com/mig-2g.10gb: 8
</code></pre>
To check if the deployment is functioning as planned, make use of a test manifest:
<pre class="codeWrap"><code>apiVersion: apps/v1
kind: ReplicaSet
metadata:
name: nvidia-test-mig-a100
labels:
app: nvidia-test
spec:
replicas: 4
selector:
matchLabels:
app: nvidia-test
template:
metadata:
labels:
app: nvidia-test
spec:
containers:
- name: nvidia
image: oguzpastirmaci/gpu-burn
args:
- "10000"
resources:
limits:
nvidia.com/mig-2g.10gb: 1
</code></pre>
<pre class="codeWrap"><code>$ kubectl get po </code></pre>
NAME READY STATUS RESTARTS AGE
nvidia-test-mig-a100-bw95c 1/1 Running 0 78s
nvidia-test-mig-a100-drxg5 1/1 Running 0 78s
nvidia-test-mig-a100-kk5wb 1/1 Running 0 78s
nvidia-test-mig-a100-n9mbr 1/1 Running 0 78s
Monitoring your cluster
With an array of GPU cards and diverse operational mechanisms available, it is crucial to monitor resource usage to ensure that resources are not idle when they can be reassigned.
By employing the gpu-operator and enabling monitoring with Prometheus using the kube-prometheus-stack helm chart, you can gather metrics provided by the NVIDIA DCGM exporter. Internally, we have developed a dashboard to display resource usage in clusters that support heterogeneous nodes and various mechanisms. It can be found in the upstream Grafana dashboard repository.
While CUDA cores are engineered for general-purpose parallel computing, Tensor cores are tailored for deep learning and AI applications. Consequently, not all workloads will gain advantages from them.
Conclusions
As apparent, the installation and configuration of your Kubernetes cluster for employing NVIDIA GPUs is rather straightforward owing to the NVIDIA provided GPU-operator helm chart. However, certain details should be considered regarding the underlying host kernel and OS used to ensure compatible kernel modules can be utilized/compiled.
In this segment, we illustrated how to employ time-slicing and MIG configuration on the cluster nodes. For more intricate deployments, the cluster administrator also holds the ability to configure time-slicing atop MIG GPU instances, although this wasn't demonstrated here.
Since we are individually labeling each node, we can have the coexistence of differing configurations - full card, time-slice, and MIG - within a single cluster. This becomes beneficial if we have a cluster with mixed card types (T4, A100, …) and aim to accommodate varying profiles to optimize cluster resource utilization.


Facing Challenges in Cloud, DevOps, or Security?
Let’s tackle them together!
get free consultation sessions
We will contact you shortly.
