

Understanding Terragrunt: Use Cases and Examples
Want to know more about Terragrunt and if it's the right choice for your WordPress setup? Keep reading, and you'll find out.
Terragrunt functions as a slim covering layer for Terraform, offering additional utilities to maintain DRY (Don't Repeat Yourself) principles in your Terraform configurations. By employing Terragrunt, you gain the ability to efficiently handle remote states and handle various environments. Furthermore, it assists in maintaining a tidy and well-organized codebase.
Advantages of Choosing Terragrunt
Opting for Terragrunt offers numerous advantages compared to relying solely on raw Terraform code. We just outlined the main reasons here, and further details will be provided in the subsequent section on Terragrunt features.
- DRY Code and Configurations
- Versioning and Environment Management
- Dependency Management
- Custom Action Hooks
- Maintain DRY Remote State Configurations
- Ensure DRY CLI Flags
- Simultaneous Execution of Terraform Commands on Multiple Modules
- Multi-Account Compatibility with AWS
How to Start With Terragrunt
To get started and set up Terragrunt, follow these steps:
- Download the binary corresponding to your operating system from the Releases Page.
- Add the downloaded binary to your PATH. Alternatively, you can opt for a package manager, as demonstrated here.If you're using Codespaces to follow our guide, all the necessary binaries are pre-installed for your convenience.
Basic Commands
Instead of executing Terraform commands directly, use Terragrunt for the same operations:
- terragrunt init -> corresponds to terraform init
- terragrunt plan -> equivalent to terraform plan
- terragrunt apply -> corresponds to terraform apply
- terragrunt output -> mirrors terraform output
- terragrunt destroy -> corresponds to terraform destroy
These Terragrunt commands trigger the respective Terraform commands, with Terragrunt incorporating additional logic before and after the execution of Terraform operations.
Infrastructure Management witn Terragrunt
Terragrunt proves valuable in overseeing your infrastructure setups, blueprints, and the Terraform backend. By crafting a terragrunt.hcl file, you can articulate your Terragrunt configuration. This file empowers you to specify particular versions of your Terraform modules and input environment-specific variables.
Terragrunt Features in Detail
Let's delve deeper into the core capabilities of Terragrunt:
- DRY Code: Terragrunt facilitates code efficiency by enabling the definition of common input variables and environment-specific variables, minimizing duplication.
- Infrastructure Management: Simplifying the oversight of multiple environments, Terragrunt ensures a distinct separation, streamlining the management process.
- Versioning: Terragrunt enables referencing specific versions of Terraform modules for each environment, offering enhanced control and the ability to revert changes.
- Hooks: Terragrunt supports hooks for executing actions before or after Terraform commands, providing flexibility in command sequence.
- Remote State Configuration: Ensure DRYness in remote state configuration by defining the backend block once in a root terragrunt.hcl file and inheriting it across Terraform environments. Terragrunt automates the creation of remote state and associated resources.
- Maintaining Dryness in CLI Flags: Terragrunt offers the ability to keep your Command Line Interface (CLI) flags DRY by configuring it to pass specific CLI arguments for designated commands. Achieve this by utilizing a configuration block in your terragrunt.hcl file.
- Simultaneous Execution of Terraform Commands:Instead of manual execution in different environment subfolders, Terragrunt's run-all command facilitates deploying multiple Terraform modules concurrently.
- Managing Multiple AWS Accounts: Terragrunt facilitates collaboration across multiple AWS accounts by allowing you to designate the IAM role for each account. You can specify the role using either the --terragrunt-iam-role command line argument or the TERRAGRUNT_IAM_ROLE environment variable. Terragrunt takes care of invoking the sts assume-role API on your behalf and exposes the obtained credentials as environment variables during Terraform execution. This approach ensures the efficient administration of your infrastructure across diverse AWS accounts, eliminating the need to store AWS credentials in plaintext, manually invoke assume-role, or modify Terraform code or backend configurations.
Optimizing Terragrunt and Effective Approaches
- Efficient Configuration Structuring: Arrange your Terraform code systematically by creating modules, and employ Terragrunt to cite these modules with precise versions.
- Dependency Oversight: Leverage Terragrunt to supervise dependencies among your infrastructure elements, ensuring a cohesive deployment process.Harnessing Terragrunt
- Hooks: Make the most of hooks to execute actions prior to or following Terraform commands, enhancing flexibility in your workflow. Streamlined Automation through
- CI/CD:Integrate Terragrunt seamlessly into your CI/CD pipeline to achieve automated infrastructure deployment, streamlining the development lifecycle.Advantages and
Limitations of Terragrunt
While Terragrunt presents numerous advantages, it also comes with certain drawbacks, including:
- Increased Infrastructure Complexity: Terragrunt introduces an extra layer of complexity in managing your infrastructure, potentially requiring more initial setup.
- Additional Management Tool: It serves as an additional tool for overall infrastructure management.
- Incompatibility with Terraform Cloud: Terragrunt does not seamlessl integrate with Terraform Cloud.
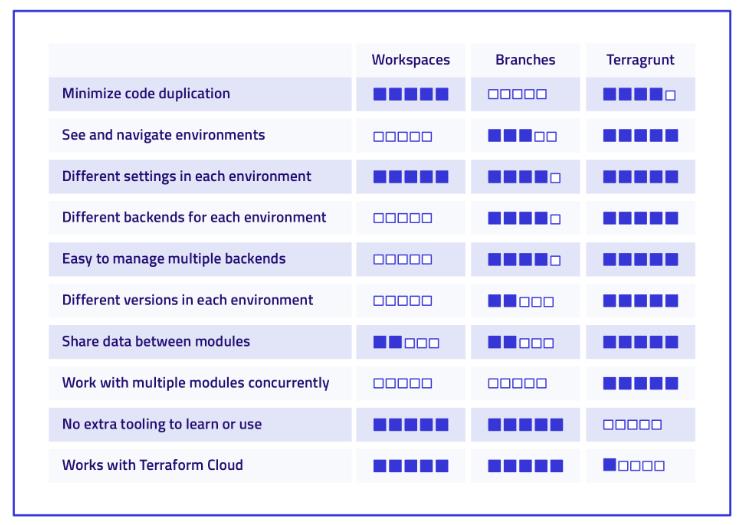
Despite these drawbacks, Terragrunt offers substantial benefits, especially when used in conjunction with env0. Env0 stands out as one of the few tools fully compatible with Terragrunt, allowing you to maximize its advantages. Yevgeniy Brikman, co-founder of Gruntworks (the entity behind Terragrunt), provides a valuable comparison between Terraform workspaces, Git branches, and Terragrunt. His comprehensive analysis is succinctly summarized in the following table.
When to Use Terragrunt?
Terragrunt finds practical application in diverse scenarios, including the efficient management of infrastructure across distinct environments such as development, staging, and production. In the forthcoming example, we will delve into the utilization of Terragrunt to enhance the Dry Run (DRY) principle within our Terraform configuration.
The approach involves initially executing processes solely with pure Terraform, followed by an exploration of how Terragrunt can elevate the efficiency of our configuration.For the sake of simplicity, our illustration will focus on two environments exclusively: dev and prod.
Our WordPress Module
To highlight the disparity between employing pure Terraform and integrating Terragrunt, we will use an illustrative WordPress application. This particular example has been adapted from a repository but has undergone slight modifications to suit our specific requirements.
The Terraform module for WordPress is designed to instantiate the following components:
- A Virtual Private Cloud (VPC)
- One Public Subnet dedicated to the EC2 instance
- Two Private Subnets designated for the RDS
- An Internet Gateway
- A route table
- Security groups tailored for both EC2 and RDS
- An EC2 instance hosting the WordPress application
- An RDS instance serving as the MySQL database for WordPress
Terraform Only Configuration
In a scenario where Terraform is exclusively employed, the folder structure is as follows:
<pre class="codeWrap"><code>
├── environments│
│ ├── dev│
│ │ ├── main.tf│
│ │ └── outputs.tf│
│ └── prod│
│ ├── main.tf│
│ └── outputs.tf
└── modules
└── wordpress
├── aws_ami.tf
├── main_script.tf
├── outputs.tf
├── user_data.tpl
├── userdata_ubuntu.tpl
├── variables.tf
└── versions.tf
</code></pre>
Within each environment folder, an evident duplication of code is observed in both the main.tf and outputs.tf files. Despite adopting a modular structure with Terraform, there exists unnecessary redundancy in code. It's crucial to bear in mind that leveraging Terraform modules is an effective strategy for promoting code reusability. Below is the content encapsulated in the main.tf file for the development (dev) environment.
<pre class="codeWrap"><code>terraform {
backend "s3" {
bucket = "tekanaid-terragrunt-demo"
key = "wordpress/dev/terraform.tfstate"
region = "us-east-1"
encrypt = true
dynamodb_table = "my-lock-table"
}
}
module aws_wordpress {
source = "../../modules/wordpress"
database_name = "wordpress_db" // database name
database_user = "wordpress_user" //database username
database_password = "dev-PassWord4-user" //password for user database
region = "us-east-1"
IsUbuntu = true
AZ1 = "us-east-1a" // for EC2
AZ2 = "us-east-1b" //for RDS
AZ3 = "us-east-1c" //for RDS
VPC_cidr = "10.0.0.0/16" // VPC CIDR
subnet1_cidr = "10.0.1.0/24" // Public Subnet for EC2
subnet2_cidr = "10.0.2.0/24" //Private Subnet for RDS
subnet3_cidr = "10.0.3.0/24" //Private subnet for RDS
PUBLIC_KEY_PATH = "./mykey-pair.pub"
PRIV_KEY_PATH = "./mykey-pair"
instance_type = "t2.micro" //type of instance
instance_class = "db.t2.micro" //type of RDS Instance
root_volume_size = 22
}
</code></pre>
The main.tf file for the production (prod) environment is outlined as follows.
<pre class="codeWrap"><code>terraform {
backend "s3" {
bucket = "tekanaid-terragrunt-demo"
key = "wordpress/prod/terraform.tfstate"
region = "us-east-1"
encrypt = true
dynamodb_table = "my-lock-table"
}
}
module aws_wordpress {
source = "../../modules/wordpress"
database_name = "wordpress_db" // database name
database_user = "wordpress_user" //database username
database_password = "prod-PassWord4-user" //password for user database
region = "us-east-2"
IsUbuntu = true
AZ1 = "us-east-2a" // for EC2
AZ2 = "us-east-2b" //for RDS
AZ3 = "us-east-2c" //for RDS
VPC_cidr = "10.10.0.0/16" // VPC CIDR
subnet1_cidr = "10.10.1.0/24" // Public Subnet for EC2
subnet2_cidr = "10.10.2.0/24" //Private Subnet for RDS
subnet3_cidr = "10.10.3.0/24" //Private subnet for RDS
PUBLIC_KEY_PATH = "./mykey-pair.pub"
PRIV_KEY_PATH = "./mykey-pair"
instance_type = "t2.small" //type of instance
instance_class = "db.t2.small" //type of RDS Instance
root_volume_size = 22
}
</code></pre>
There are two primary aspects to observe when comparing the two main.tf files:
- Divergent Backend Configurations:The configuration for the backend differs, and copying and pasting the key within this setup can be prone to errors. There's a risk of unintentionally using the production state file in the development environment, and vice versa. Additionally, there's the possibility of unintentionally overwriting an existing state file. It's important to note that using variables in the backend configuration block is not permitted.
- Duplicate Input Variables in aws_wordpress Module:Some of the input variables in the aws_wordpress module are replicated. While this may not pose a significant issue in this instance, it becomes more noticeable when dealing with multiple Terraform modules. The distinctions become more apparent in such cases.
Now, let's examine the output variables in the outputs.tf file for the development environment.
<pre class="codeWrap"><code>output "IP" {
value = module.aws_wordpress.IP
}
output "RDS-Endpoint" {
value = module.aws_wordpress.RDS-Endpoint
}
output "INFO" {
value = module.aws_wordpress.INFO
}
</code></pre>
Take note that they are identical. Once again, this contravenes the DRY principle, and the situation gets so much worse when dealing with numerous other environments and applications.
Deploy Using Just Terraform
Follow the steps outlined below to deploy the WordPress application utilizing only Terraform code. In the Terraform_Only/environments/dev directory, generate a key pair with an empty passphrase.
<pre class="codeWrap"><code>ssh-keygen -f mykey-pair
sudo chmod 400 mykey-pair
</code></pre>
To establish a remote backend for storing Terraform state files, create an S3 bucket and a DynamoDB table in AWS.
Execute the following Terraform commands:
<pre class="codeWrap"><code>terraform init
terraform plan
terraform apply</code></pre>
To deploy the production WordPress application, repeat the same procedures but within the Terraform_Only/environments/prod directory.
Below is the output of the terraform apply command:

Access the WordPress setup screen by navigating to the 'http://54.167.129.51' address.
Terragrunt Version
Now, examine how Terragrunt can enhance the structure of our Terraform code.The local file system structure, when employing Terragrunt, is as follows. Observe that there is a root terragrunt.hcl configuration file and an individual terragrunt.hcl configuration file for each environment folder.
<pre class="codeWrap"><code>
├── environments│
│ ├── dev│
│ │ └── terragrunt.hcl│
│ ├── prod│
│ │ └── terragrunt.hcl│
│ └── terragrunt.hcl
└── modules
└── wordpress
├── aws_ami.tf
├── main_script.tf
├── outputs.tf
├── user_data.tpl
├── userdata_ubuntu.tpl
├── variables.tf
└── versions.tf
</code></pre>
The RootTerragrunt Configuration File
Now, let's examine the principal or main Terragrunt configuration file named terragrunt.hcl, located directly within the environments folder.
<pre class="codeWrap"><code>remote_state {
backend = "s3"
config = {
bucket = "tekanaid-terragrunt-demo"
key = "terragrunt/wordpress/${path_relative_to_include()}/terraform.tfstate"
region = "us-east-1"
encrypt = true
dynamodb_table = "my-lock-table"
}
}
inputs = {
ami_id = "ami-0c55b159cbfafe1f0" # Amazon Linux 2 AMI
database_name = "wordpress_db" // database name
database_user = "wordpress_user" //database username
IsUbuntu = true
PUBLIC_KEY_PATH = "./mykey-pair.pub"
PRIV_KEY_PATH = "./mykey-pair"
root_volume_size = 22
}
</code></pre>
Observe how the key in the remote_state block is parameterized. Each environment folder will possess its unique key, eliminating the need for manual copying and pasting. Consequently, the dev environment's key will be:
<pre class="codeWrap"><code> erragrunt/wordpress/dev/terraform.tfstate</code></pre>
Meanwhile, the prod environment's key will be:
<pre class="codeWrap"><code>terragrunt/wordpress/prod/terraform.tfstate</code></pre>
A noteworthy point is the definition of input variables shared across all environments within this file. This is another example of how we adhere to the DRY concept. Now, let's investigate the Terragrunt configuration files for the development and production environments. These files are located respectively under the environments/dev and environments/prod folders.
Below is the content of the terragrunt.hcl file within the environments/dev folder.
<pre class="codeWrap"><code>include {
path = find_in_parent_folders()
}
terraform {
source = "../../modules//wordpress"
}
inputs = {
database_password = "dev-PassWord4-user" //password for user database
region = "us-east-1"
AZ1 = "us-east-1a" // for EC2
AZ2 = "us-east-1b" //for RDS
AZ3 = "us-east-1c" //for RDS
VPC_cidr = "10.0.0.0/16" // VPC CIDR
subnet1_cidr = "10.0.1.0/24" // Public Subnet for EC2
subnet2_cidr = "10.0.2.0/24" //Private Subnet for RDS
subnet3_cidr = "10.0.3.0/24" //Private subnet for RDS
instance_type = "t2.micro" //type of instance
instance_class = "db.t2.micro" //type of RDS Instance}
</code></pre>
Similarly, here is the content of the terragrunt.hcl file within the environments/prod folder.
<pre class="codeWrap"><code>include {
path = find_in_parent_folders()
}
terraform {
source = "../../modules//wordpress"
}
inputs = {
database_password = "prod-PassWord4-user" //password for user database
region = "us-east-2"
AZ1 = "us-east-2a" // for EC2
AZ2 = "us-east-2b" //for RDS
AZ3 = "us-east-2c" //for RDS VPC_cidr = "10.10.0.0/16" // VPC CIDR
subnet1_cidr = "10.10.1.0/24" // Public Subnet for EC2
subnet2_cidr = "10.10.2.0/24" //Private Subnet for RDS
subnet3_cidr = "10.10.3.0/24" //Private subnet for RDS
instance_type = "t2.small" //type of instance
instance_class = "db.t2.small" //type of RDS Instance
}
</code></pre>
In both the Terragrunt configuration files for dev and prod, you'll observe the inclusion of inputs from the primary Terragrunt config file using the find_in_parent_folders() function. Additionally, specific input variables for each environment are also incorporated, exemplifying a highly DRY approach.The next noteworthy aspect is the presence of the source attribute within the terraform block.
Here, we are making a reference to the Terraform module named "Wordpress," which is located two levels above in the modules folder. It's also worth noting that Terragrunt allows referencing Terraform modules residing in Git repositories, presenting a more practical approach.
An additional advantage of utilizing Terragrunt becomes apparent when sourcing different versions of Terraform modules for various environments. For instance, the development (dev) environment might be utilizing version v0.0.2 of the Wordpress module, while the production (prod) environment is still on version v0.0.1.
Subsequently, after thorough testing in the dev environment, the production environment can be upgraded to version v0.0.2. Notably, with pure Terraform, the source block cannot be parameterized, resulting in all environments running with the same module version unless version values are hard-coded.
Deploying WordPress with Terragrunt
Follow the steps below to deploy the WordPress application using only Terraform code:
In the Terragrunt/environments/dev folder, generate a private/public key pair with an empty passphrase.
<pre class="codeWrap"><code>ssh-keygen -f mykey-pair
sudo chmod 400 mykey-pair
</code></pre>
Execute the following Terragrunt commands:
<pre class="codeWrap"><code>terragrunt init
terragrunt plan
terragrunt apply
</code></pre>
Terragrunt automatically configures the AWS remote backend, creating an S3 bucket and a DynamoDB table.To deploy the production WordPress application, repeat the same steps in the Terragrunt/environments/prod folder.
The output of the terragrunt apply command will be as follows:

Take note that the Terragrunt output mirrors the previous Terraform-only scenario, except there is no need to define an outputs.tf file to display variables from the module. Terragrunt handles this automatically.Upon visiting the provided URL, you will encounter the familiar WordPress setup screen as seen earlier.
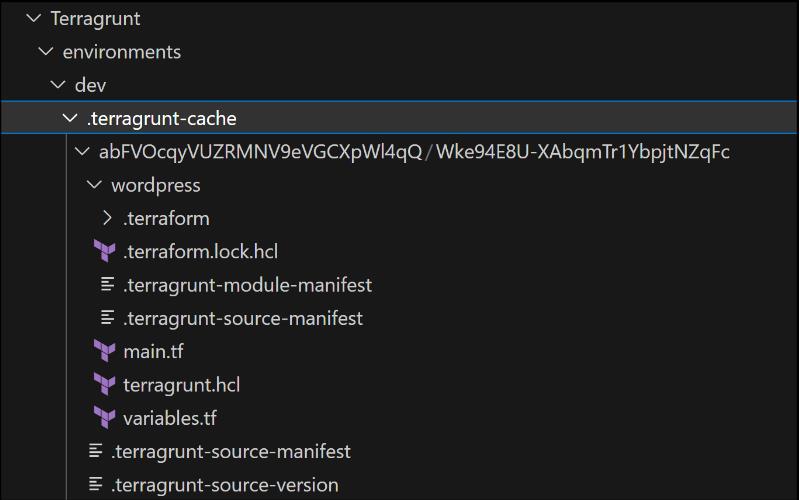
Terragrunt Cache Overview
The Terragrunt cache is a directory generated by Terragrunt within the present working directory. Its purpose is to store downloaded Terraform configurations, modules, providers, and backend settings.
This cache is instrumental in preventing redundant downloads of the same code, consequently expediting the execution of Terraform commands. Users have the flexibility to delete this folder at their discretion, as Terragrunt will automatically recreate it when required.
Moreover, the location of this cache can be modified by configuring the TERRAGRUNT_DOWNLOAD environment variable. The cache structure resembles the following: Feel free to manage and customize this cache based on your specific requirements.
Cleanup Using the run-all Command
Terragrunt offers a convenient feature enabling the execution of commands across multiple folders simultaneously.
In this scenario, we will utilize the following command to concurrently destroy the dev and prod environments from within the Terragrunt/environments folder:
<pre class="codeWrap"><code>terragrunt run-all destroy</code></pre>
The subsequent output demonstrates the successful destruction of both the dev and prod environments:
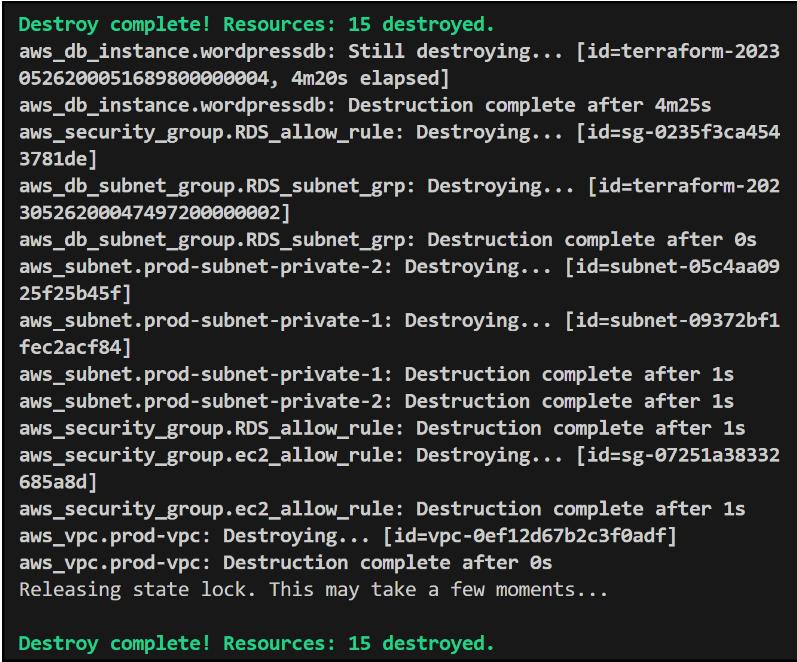
This streamlined approach simplifies cleanup procedures, providing efficiency and ease in managing multiple environments.
Terragrunt and env0
Terragrunt provides numerous advantages over Terraform, and when paired with env0, it unlocks additional benefits in managing infrastructure as code (IaC).
Leveraging env0 in conjunction with Terragrunt yields the following advantages:
- Automated Terragrunt Deployments in CI Pipelines: Seamlessly integrate Terragrunt deployments into Continuous Integration (CI) pipelines for streamlined Infrastructure as Code (IaC) processes.
- Centralized and Secure Terragrunt Variable Management: Centrally manage and secure Terragrunt variables, enhancing control and ensuring consistency across deployments.
- Integration with Different IaC Tools: Integrate Terragrunt-based environments with other environments managed by diverse IaC tools, fostering interoperability.
- Creation of Advanced Environments: Combine multiple Terragrunt deployments to construct sophisticated environments, providing flexibility in IaC architecture.
- Efficient and Reliable Terragrunt run-all: Utilize Terragrunt's run-all command to execute commands across multiple modules efficiently and reliably.
- Safe and Easy Management of Terraform State: Safely and easily manage the underlying Terraform state, enhancing the robustness of your infrastructure.
- Enhanced Reusability and Extensibility: Boost the reusability and extensibility of Terragrunt deployments, promoting a modular and scalable IaC approach.
Key Points
Terragrunt proves to be a robust instrument, elevating the Terraform encounter with aspects such as DRY code, version control, handling dependencies, and implementing hooks. Adhering to recommended methods and making the most of Terragrunt's functionalities enables the establishment of a streamlined and sustainable process for managing infrastructure in extensive deployments. The integration of env0 with Terragrunt allows you to fully unlock the capabilities of your Infrastructure as Code approach.


Facing Challenges in Cloud, DevOps, or Security?
Let’s tackle them together!
get free consultation sessions
We will contact you shortly.
